


Clothespin Craft Ideas …Clothespins are a very simple invention that are cheap and one of the most affordable craft supplies. However, one can make out great crafts of these. They are all very creative and fun ideas!
The very first Clothespins were made of wood and currently we find them in PVC. They are available with a wide variety of colors and styles that make creative clothespin crafts to make with much more fun.
Their uses are varied, since they are not only used for clothing but also for other issues in our homes. With a little imagination, these simple clips can be transformed into adorable decorations, useful tools, or delightful gifts such as preserving food containers once opened…etc. Besides their low cost, and so easy to find make them an ideal complement for crafts and creative ideas.
Wooden clothespins offer an elegant finish in all crafts when compared to plastic, they have greater versatility, and wood offers special colors and tones, plastic clothespins do not allow it, nor do they have the same level of resistance. This makes them perfect for eco-friendly clothespin crafts and home décor DIYs.

45 Fun Clothespin Craft Ideas for Kids or Adults
Sometimes it happens that we are a little out of ideas and it is difficult to know exactly what projects to do without a little prior guidance. Therefore, with this article we will be happy to provide you with some ideas on creations with clothespins. And you will find at the end of this gallery beautiful images with clothespin crafts.
Creative DIY Clothespin Craft Home Décor
Whether you’re looking for family-friendly clothespin crafts or fun solo projects, this list of easy clothespin craft ideas has something for everyone.
Simple Clothespin Crafts For Beginners

Wooden Clothespins Candles
Turn a piece of cardboard and some painted clothespins is a simple preschool clothespin craft into. A kid-friendly clothespins candles that toddlers and preschoolers can “light” by clipping a paper flame into the colorful clothespin candle.

Adorable Pilgrim Clothespin Ddolls
These sweet little figures would make a lovely addition to any Thanksgiving display.

Turkey Clothespin Crafts
Enjoy the Thanksgiving spirit and prepare for the tradition of the American dinner. It’s a holiday filled with warmth, gratitude, and delicious food.
Creative Clothespin Crafts To Make

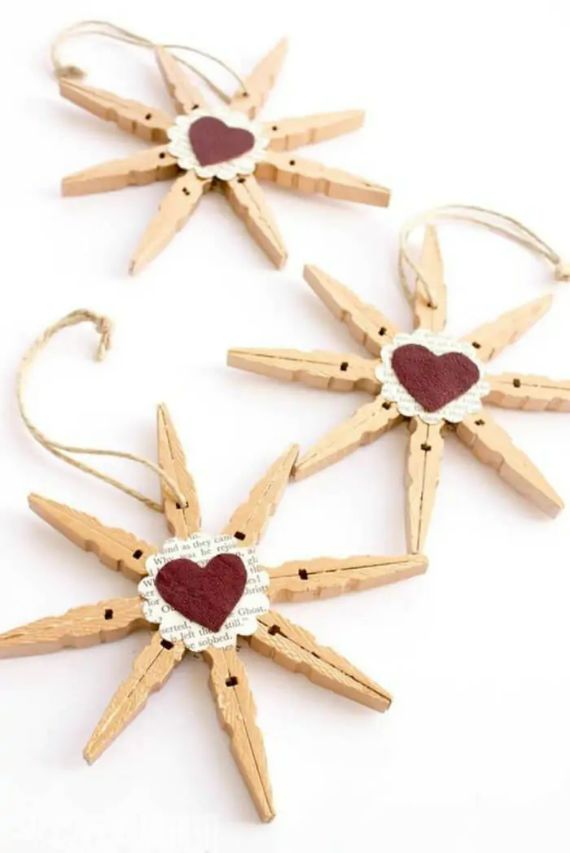
Vintage Reindeer Clothespin Christmas Ornaments
Evoke the sense of traditional and homespun Christmas celebrations. These simple materials and construction is a treasure for their nostalgic appeal and for a holiday touch. The Vintage Reindeer Clothespin Christmas Ornaments are used as an Ornament to be hung on a Christmas tree.

Clothespins Monstrous Hooks Craft
This simple and enjoyable clothespin craft for kids is ideal of all ages to create independently, with minimal parental assistance. They’ll have a blast designing a variety of silly and expressive faces for these fun clothespin hangers.

Wooden Clothespins Lion
We’ve explored a menagerie of wooden clothespin creatures, and the crafting fun continues! Next in line for our clothespin transformation is a majestic lion, complete with a wonderfully wild mane.

Clothespins Christmas Wreath Craft
Little felt trees with sparkly beads are clipped onto a ring with clothespins. Easy and fun craft for kids to make their own festive decoration!
DIY CLOTHESPIN GARLAND/ Holiday Crafts Using Clothespins
Create a cheerful DIY clothespin craft at home … a colorful DIY clothespin garland using spray-painted clothespins. It’s a great holiday craft using clothespins and a cheap craft idea for Valentine’s Day, birthdays, or any celebration.
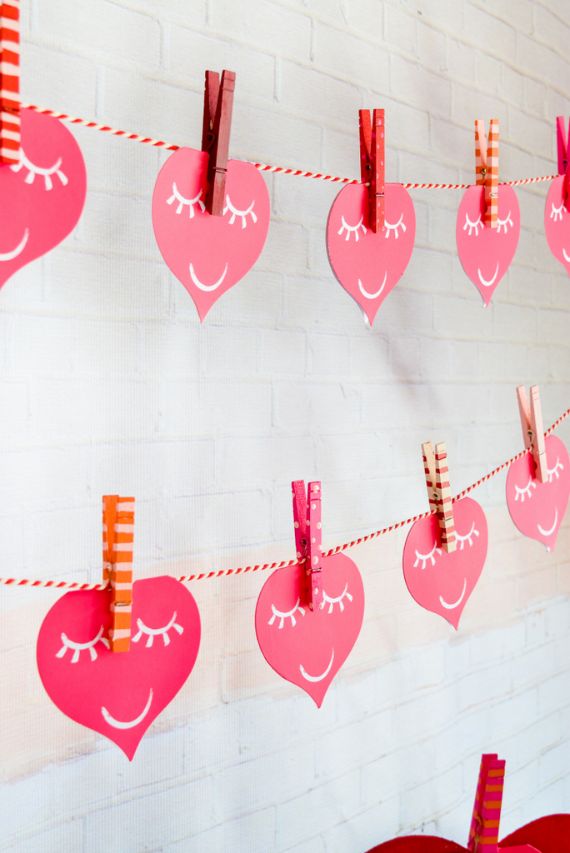
Valentine’s Day Clothespin Garland
Valentine’s Day is one of those day activities that little ones love card exchange in their class. Naturally they love to hold onto their cards for a long time long after Valentine’s Day, because they spent so much effort and time while choosing their Valentine’s Day cards.
To recycle these kids card exchange can make a DIY Valentine’s Day Clothespin Garland where pure joy continues! This DIY Valentine’s Clothespin craft will be displayed in an adorable way. Plus you’ve got a ready built art display. OR make a party Clothespin decoration banner with clothespins using your favorite spray paint colors. Great home decor for kids on Mother Day or Valentine Day as well!

Christmas Clothespins Garland
🎄 How to Make a Christmas Clothespins Garland
Materials Needed:
- Wooden clothespins
- Red and white baker’s twine or string
- Felt (red, green, white)
- Glitter, buttons, and ribbon for decoration
- Hot glue gun or strong craft glue
- Scissors
- Mini holiday decorations (candy canes, stockings, holly leaves, stars, etc.)
Instructions:
- Decorate the Clothespins
Use felt, glitter, and small holiday embellishments to decorate each clothespin. Cut shapes like stockings, holly, stars, or candy canes and glue them onto the top of the clothespins. - Add Extra Sparkle
For added flair, sprinkle glitter or add small buttons and bows to your felt shapes. Let everything dry completely. - Prepare the Garland String
Cut a length of baker’s twine or any festive string, depending on how long you want your garland to be. - Attach the Clothespins
Clip the decorated clothespins evenly along the string. You can adjust them anytime to space them how you like. - Hang Your Garland
Use tape, push pins, or hooks to hang the garland across a wall, window, mantle, or shelf.

Halloween clothespin garland craft
Give your Halloween decor a whimsical update with this Halloween felt craft mini clothesline featuring a witch’s laundry! The charming line showcases her broom, a long-sleeved dress, her signature crooked hat, striped socks, stylish high-heeled boots, and even a pair of bloomers to add a unique touch to your spooky season.
Clothespin Crafts for Kids
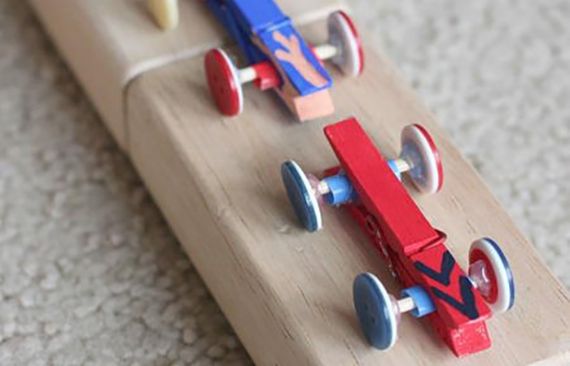
Cars with clothespins
These homemade clothespin cars sound like a fun for kids who like cars! They are creative project for childrento make but also to play with. They are good for hours of activity.
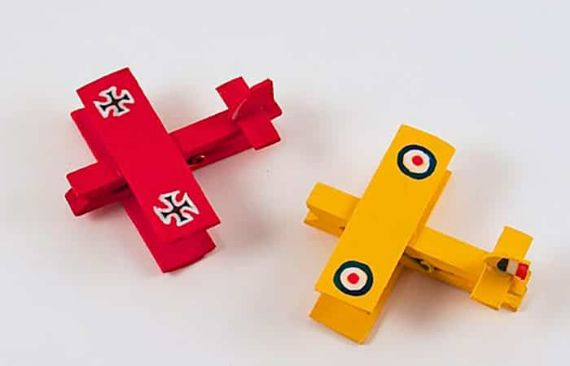
Clothespin Airplane
What do you think if you can create simple DIY airplane toy made with wooden clothespins? The wings are made of EVA foam, just glued for decorations.
Another idea of clothespin crafts for children is to paint them with some paint. You can then put a strip of flexible magnet and use your clamp plane to grab notes on the refrigerator. Enjoy creating and playing with your homemade wooden clothespin planes!
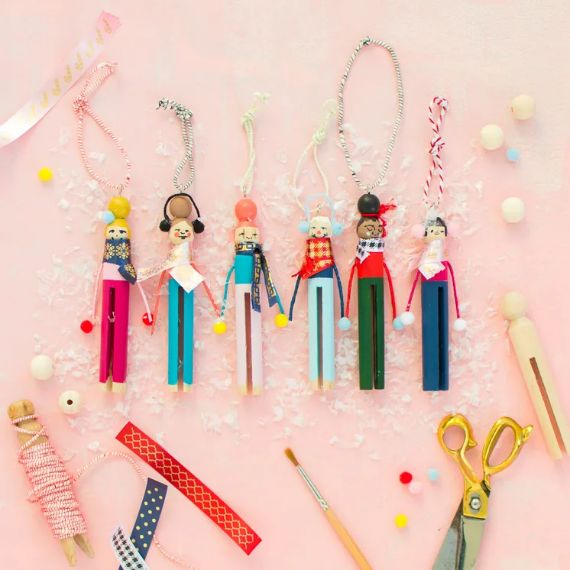
Clothespin People Ornaments
Say goodbye to boring Christmas ornaments and elevate your holiday tree decor with charming handmade Christmas clothespin people ornaments dressed in bright colors! These delightful creations will add an adorable touch to your festive Christmas decorations. Clothespin puppet craft tutorial Via link.
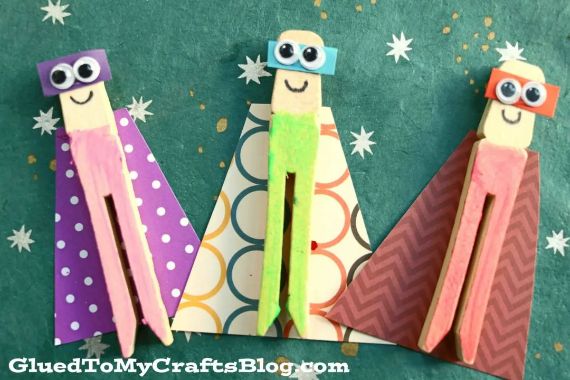
Superhero Puppets with clothespins
This fun and easy preschool clothespin craft idea is perfect for keeping little ones busy and enjoying having fun. Help them to create their own Superhero Puppets using clothespins, paint, and imagination! This is a new and exciting craft activity for kids of several ages.
Today we present to you an awesome and easy DIY crafts with clothespins …superhero clothes pin which are perfect for a quick and simple kids craft idea. This clothespin superhero craft idea will not only keep them entertained for hours, but also inspire their creativity and imagination, and encourages fine motor skills development.
With just a few simple materials and easy-to-follow instructions though the link under the image, so your little ones can create their very own superhero characters out of clothespins.
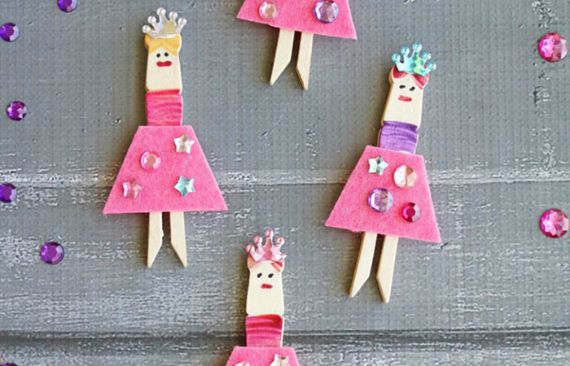
DIY Ballerina Clothespin Ornaments
Creating ballerina clothespin ornaments is a delightful Christmas craft activity for an elegant tree decoration and a holiday clothespin craft for both kids and adults. This activity can be enjoyed by both children and adults. These cute Ballerina ornaments are made with simple materials like clothespins and Eva foam. Clearly, she needed a colored dress.
Whether you’re looking to add a touch of style by adding wings or any other details such as eyes, nose, and mouth. Once you have completed your ballerina clothespin ornaments display it or hang on a Christmas tree, a garland, or any other desired location.
Fun Clothespin Crafts For Adults

Adorable DIY Wooden Clothespin Bookmark Craft
The simplest craft ideas are the best, easy to make, functional and fun. With a few wooden clothespins, fabric scraps and a little paint you can make an adorable cute wooden clothespin bookmark in no time!
This super cute wooden clothespin snowman bookmark is a perfect craft project for adults. You may add felt, buttons, or stickers to a clothespin to create unique DIY bookmarks.

Clothespin Planter Labels… Clothespin Crafts for Gardening
Label your indoor or outdoor plants with painted clothespins clipped to sticks. Put an end to these daily arguments by making plant markers with these DIY Garden markers that are fun and easy to personalize.

Clothespins as Drink Markers
Make a bunch in different colors and clip them onto glasses making it easier to spot every guest drink in the crowd. These painted clothespin craft ideas work just as well on any thin glasses as it does on red plastic cups.

Santa Candy Canes Christmas Clothespin
Christmas clothespins decorated with a festive theme… these painted clothespins are painted in traditional Christmas colors of red and green and feature unique hand-painted designs. Perfect for adding a whimsical touch for handmade Christmas decorations.
Easy Clothespin Craft Ideas

DIY Mini Clothespin Picture Display
Use clothespins to attach your favorite photos to a string inside a vintage-style frame. This easy DIY photo display adds a cozy, personal touch to any room.

Painted Clothespin Bag Clips
Paint clothespins in bright colors or fun patterns to use as DIY bag clips in the kitchen. These are not only practical but also a cheerful addition to your pantry.
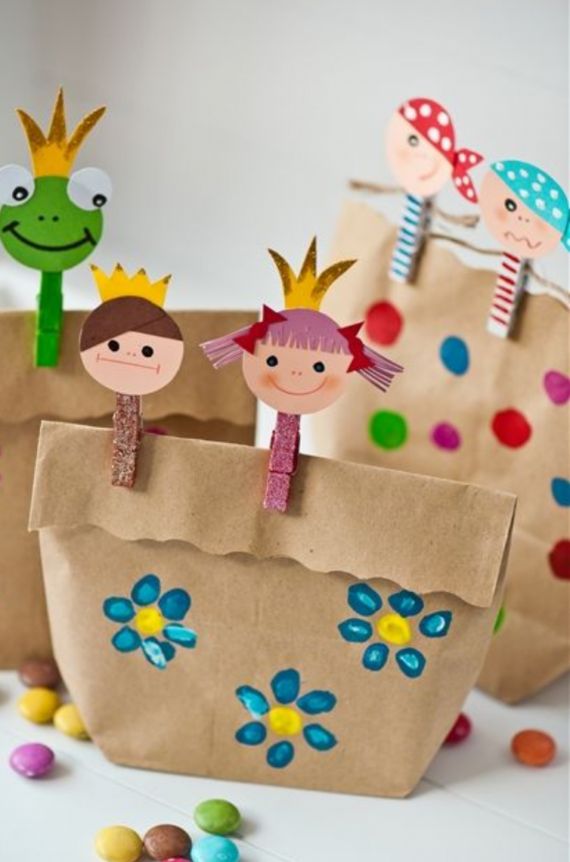
Clothespin Gift Wrapping
Who wouldn’t love to receive such a cute package…There are so many fun ways to wrap gifts! These packages are incredibly charming and have a wonderful handmade touch. The decorated paper bags combined with the creatively adorned clothespins make them feel extra special and thoughtful.
Clothespin can transform an ordinary package into something truly delightful and memorable. Your loved ones would surely feel the care and effort put into wrapping their gift this way!

Clothespin Wedding Gifts
“Kissy clips” are easy-to-make wedding gifts, eye-catching clothespin crafts that add personality and humor to weddings. These simple DIY clothespin wedding gift favors can be used as place cards at the reception, decorative accents on napkins, or holders for thank-you notes for guests.
Their versatility makes them a charming and memorable detail for the big day. These kissy clips will delight all your guests.

Clothespin Advent Calendar
An adorable clothespin Christmas crafts …Paint or number 25 clothespins and use them to hold mini gift bags or notes. Clip them to a ribbon or wooden board for a creative DIY advent calendar.
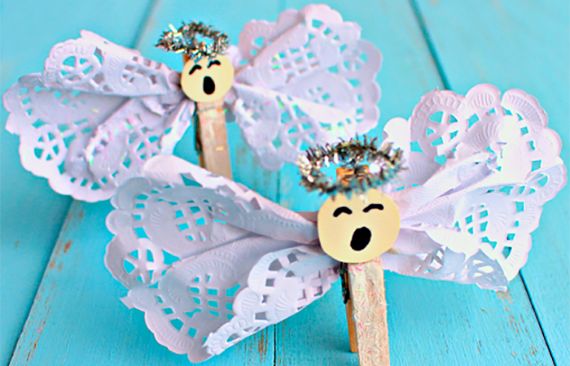
Angels clothespin craft ideas
This craft is something for everyone. You can clip these homemade Little Angels with Wings onto your Christmas tree, gift ties or around the house. All you need to make an angel craft is a 6 inch / 15cm doily and mini clothespin.
For an additional touch to Give your angel a gorgeous sparkly dress by glueing glitter to the lengths of the clothespin.
Mini Clothespin Decorations DIY

Mini Clothespin Wreath
Want to create something adorable with mini clothespins? This Mini Clothespin Wreath is a quick, easy, and budget-friendly craft that turns out charming! All you need are mini wooden clothespins, a wreath ring (or cardboard circle), a hot glue gun, faux greenery or flowers, and a decorative bow.
It’s an easy clothespin DIY great, a DIY for seasonal decor, gift giving, or even as a cute wall accent. Customize with your favorite colors and materials to match any theme or holiday!

Christmas Clothespin Crafts
These silly Christmas characters are awesome using mini clothespin as handmade toys or amusing as holiday decorations. A seasonal art projects that feature clothespins for Christmas. This simple and easy Christmas craft activity is to make but also that kids can play with them after! Put them up around the home as holiday decoration.
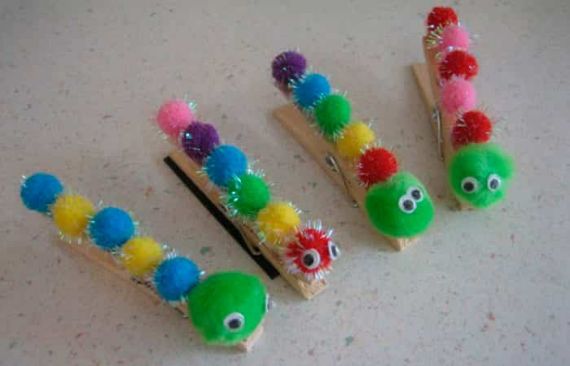
Mini Clothespin Magnets
That sounds like a fun and creative clothespin crafts for kids, just with pom poms, they are glued to a clothespin and two googly eyes to make a summer craft with free kids crafts. Attach mini magnets to the back of small clothespins and decorate them with washi tape or paint. These mini clothespin magnets are perfect for holding notes or photos on your fridge.
Simple Clothespin Decorations DIY
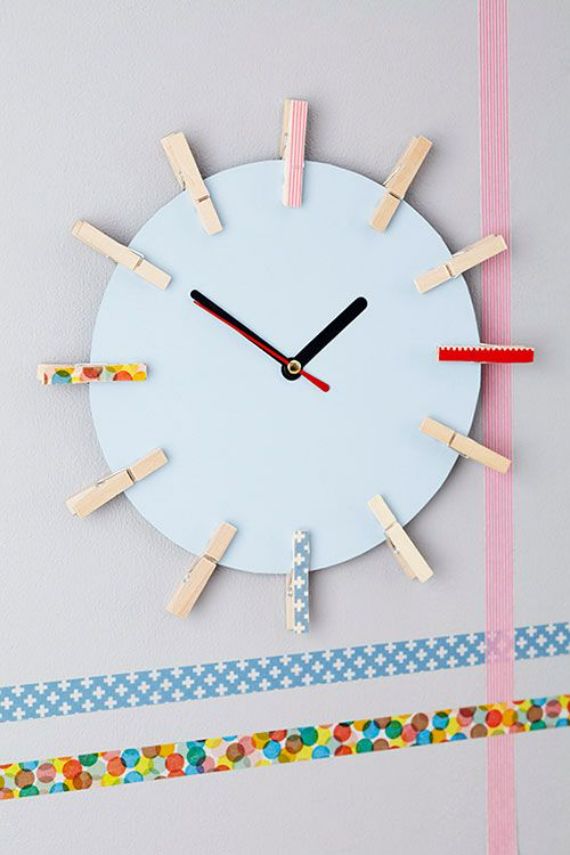
Clothespin Clock Wall Art
Having a wall clock is essential for a school classroom or a children’s room. If you want to create a functional wall clock using wooden clothespins. It’s a great kids’ clothespin craft idea and helps teach time! For this clothespin craft idea, you will need 12 clothespins, a clock mechanism, a plastic or natural wood board in a square, triangular, oval… or round shape, and glue.
Decide the shape you want your clock to be, then cut the board or have it prepared for you. Choose the colors of the design, the tone and paint the board, as well as the clamps. For these you can use acrylic paint or washi tape or combine different materials or even leave as it is, that depends on your personal touch.
Once ready and dry, install the mechanism and place the clips matching the hours on the clock. This project is a beautiful example of DIY home decor with clothespins that’s both functional and stylish.
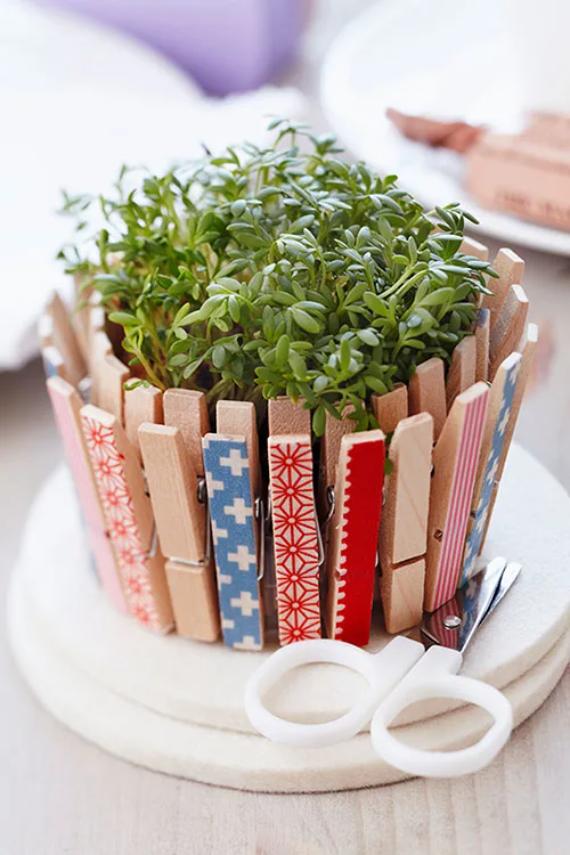
Recycled Clothespin Flowerpot
A recycled clothespin art projects is a perfect recycled crafts for adults… to recycle old jar that could end up in the trash with painted clothespins. To make a DIY flowerpot cut the container to a height of approximately 1.5 cm- the Hight of the clothespin. Wash the jar well and secure the edges with insulating tape or paper tape in the case of jars with an un-smooth end.
The base is ready, all that remains is to glue the entire diameter with clothespins. You can make your any design with paints or washi tape or both in different finishes. This makes a fun, eco-friendly clothespin craft.
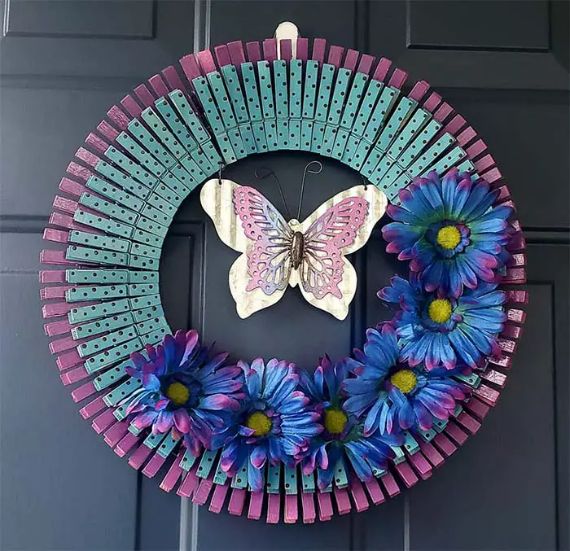
Clothespin wreath crafts
One of the un-ended decorations for all times is wreath. Although you can place them anywhere in the house, inside or out, they are typical to welcome your guests. We have already seen how they can be made with different materials, and for any occasion.
Today’s craft is very simple, recycling our clothespins so to make a beautiful Clothespin wreath craft using decorated clothespins and faux flowers. Ideal for seasonal décor using clothespins.
The materials; you will need are wooden clothespins, adhesive paper with different colors and designs, a piece of wood or hard cardboard, purple and turquoise paint, and a fabric plastic or readymade flower.
The first thing we have to do is make a circle base for the wreath. Next, we are going to decorate the clothespins in purple and turquoise. Place the clips in two circle rows to have a good visual impact. On top of it, and between the clips, we glue the flower, one of those that are typical for design you chosen and out a butterfly in the center.
Snowflake Clothespin Decorations– Winter Clothespin Crafts
Add these DIY snowflake crafts are Christmas decoration of your home. They only need a few minutes to make them…simple as that. For each snowflake you will need… Eight clothespins, Glue and Paint or washi paper (optional).
Start by take the clothespins apart to be two halves. Carefully glue them together. Arrange the eight pieces to form a snowflake. By gluing the four pieces and then add the other four pieces into the spaces in the center. If you want, you can paint each flake.
Use painted wooden clothespins painted by spray paint. These delightful snowflakes are holiday crafts using clothespins that can effortlessly be used as magnetic feathers s to be fixed on the refrigerator or to be hung on the Christmas tree or even used as a unique placemat.
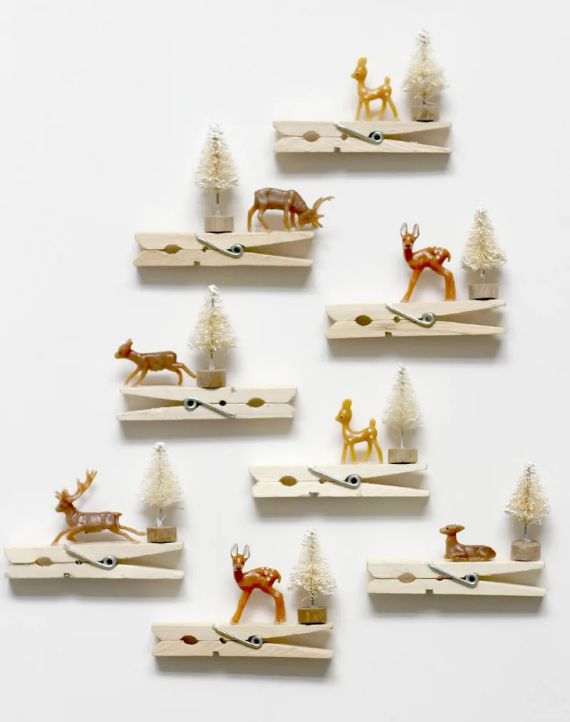
Reindeer Clothespin Ornaments
Christmas projects are always a joy, and it’s never boring to do crafts with them. As Reindeer and Christmas go hand-in-hand, which is why making fun clothespin crafts for adults is one of the famous quick clothespin crafts for rainy days that can be made.
ake these adorable reindeer clothespin ornaments, for example are easy to make. They only take 15 minutes to make! All they need is choose the mini sized reindeer and glue them to the clothespins and voala. These mini reindeer are simply irresistible, and they can even be used as charming gifts. They help you to dive into the festive spirit.
Recycled Clothespin Art Projects
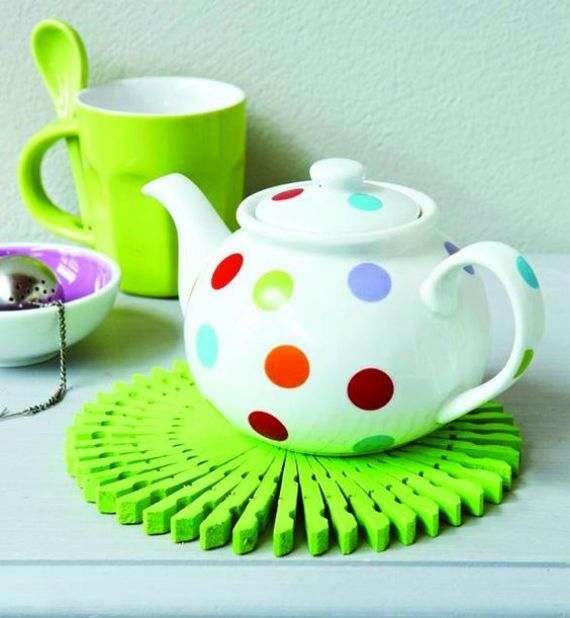
Heat Resistant Clothespin Trivets
Another DIY clothespin crafts are stylish DIY clothespin trivet -a hot stand- which are an easy and simple clothespin crafts for beginners with function. A Trivets is always a relevant and necessary thing in the kitchen or dining table to protect surfaces from the intense heat of pots and pans when serving food.
For these purposes, it is better to use wooden clothespins, as they have good heat resistance, since the plastic may accidentally melt a frying pan or pan. The crafting technique of these wooden clothespin craft is simple with the help of your child remove the springs from the clothespins, and he can easily glue them together with cold silicone or adhesive to glue into a circular shape.

Rustic Napkin holder with clothespins
Napkins are a necessary accessory on any table. To continue recycling clothespins it would be nice to make a beautiful napkin holder with wooden clothespins, to put the napkins on the table.
A wooden clothespin for napkin holder is for a rustic style kitchen or a country house. These affordable clothespin DIY projects are very easy to make, you will need clothespins 19 clothespins, and white wood glue, or silicone, either hot or cold.
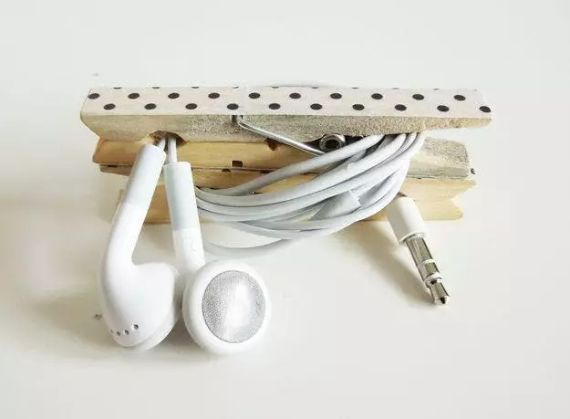
Decorated Clothespin Headphone Organizer
It is an idea with painted clothespin clips to hang clothes, very easy to do and almost without spending anything. If you’re still using wired headphones, if so, organize your headphones with clothespins for cable management so they don’t roll around the house or use it as a creative clothespin gift handmade.
DIY clothespin project is used as headphone holders, very easy to do and almost without spending anything. Depending on your taste and budget decorate the wooden clips in any color like dots, lines, flowers, hearts, whatever you can think of.
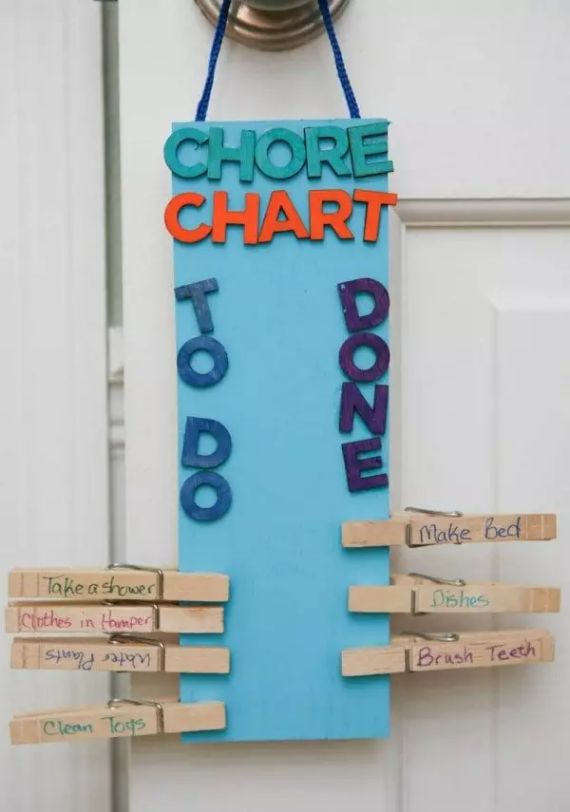
Table of pending things with clothespins
Use your board kitchen to utilize keeping track of items in order and keeping track of homework assignments. With this chart- a clothespin crafts for adults, we take the responsibility for cleaning up few of the messes every day.
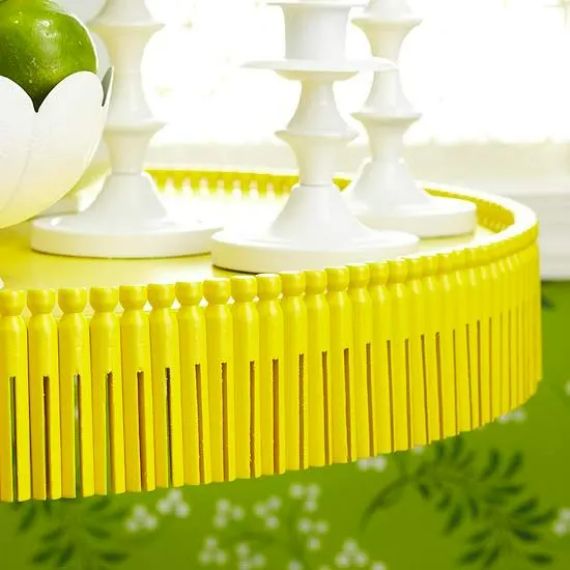
Table Edge Trim with Clothespins
An upcycled craft for adults… Transform an accent table into a stunning piece by a makeover using vintage wooden Clothespin Table Trim. This wooden clothespin craft activities are done by trimming the table edge with these unique trims, securing them in place with a small amount of wood glue or silicone.
When the glue is dry apply a coat of primer and paint to the table, resulting in a refreshed and visually appealing table.
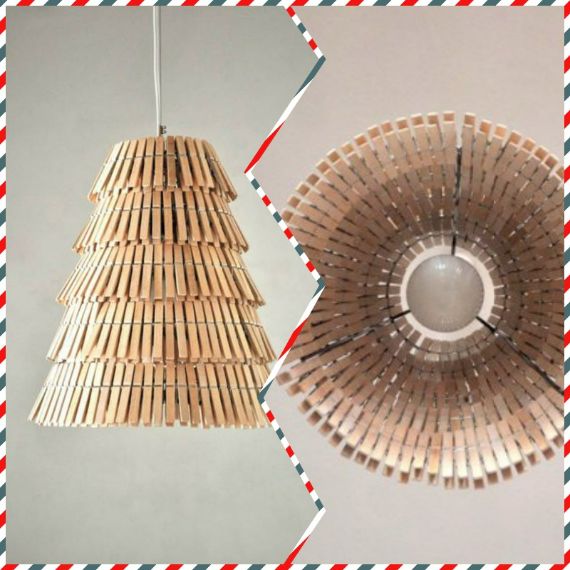
DIY Clothespin Chandelier
You can make stylish DIY clothespin crafts at home…a lamps from wooden clothespins. Create a warm ambiance using wooden clothespins attached to a lampshade frame. Clothespins are attached to any type of frame metal or even wood.
Within minutes your craft is ready! The finished lamp gives beautiful and soft shadows on the floor and walls. This elegant clothespin light fixture brings creativity and function together.
Tablecloth Weights with clothespins
Transform your tablecloth with a touch of creativity by a nontraditional crafting Material. Clothespin decorations DIY by crafting a unique tablecloth weights using clothespins, is a brilliant idea was conceived by handsoccupied takes only one hour to do so. Let’s explore how you can make these clever tablecloth weights.
Clothespin Animals Craft
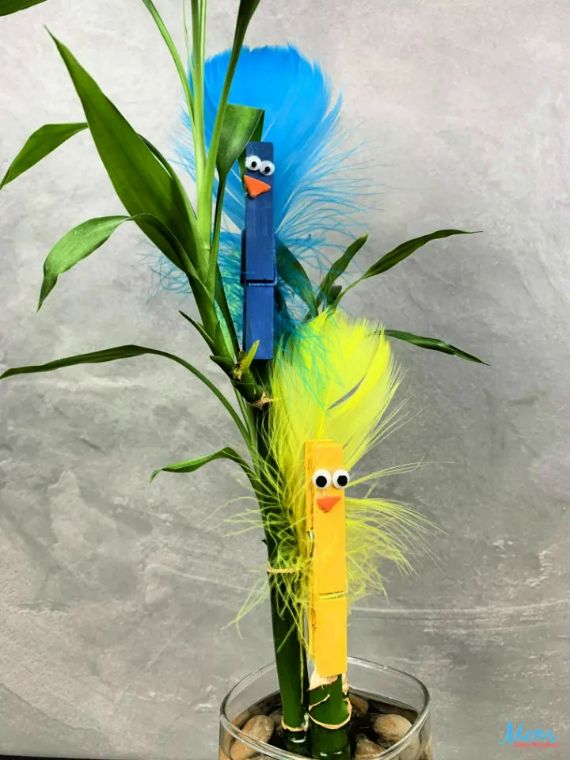
Creative Bird Buddies Clothespin Clips Crafts
If you want to use the clips to hang a message or drawings on a rail or bar, these delightful and imaginative DIY Bird Buddy craft are very fun! Creative clothespin crafts to make starts with painting the Clothespin with acrylics and paint the eyes and beak too.
Glue some colored feathers to the sides to resemble the wings and on the head, and our charming birds are ready for decorations for any space! Engage your children in this activity or use it as a unique gift for someone special.
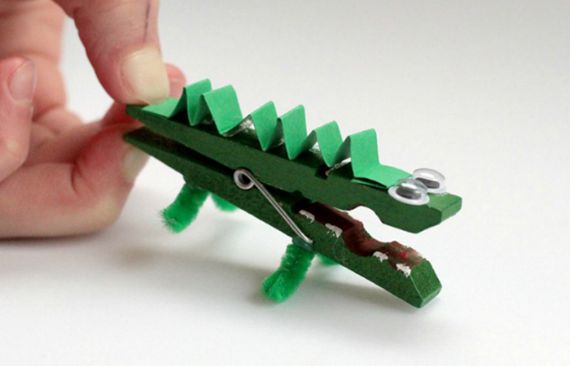
Make A Clothespin Craft Crocodile Craft
Creating a Clothespin animal craft such as scary clothespin crocodile craft can be a fun, fantastic, and simple Clothespin crocodile craft. This unique clothespin craft activity can be made both at home and as a quick and an easy preschool craft idea. But to be completed you’ll need a little help from a teacher or parents.
In order to craft a successful plan, have all supplies on hand in advance to make it easier to finish the craft without a struggle. Creating crafts with kids is not only fun but educational. It helps stimulate their imagination and develop fine motor skills.
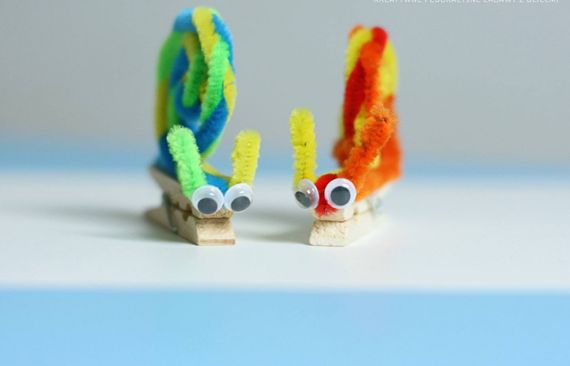
Colorful Snail Craft
Creating a colorful snail clothespin craft for summer crafts is a fun and creative activity for children. Here is the step-by-step tutorial over at Dzieciaki W Domu.
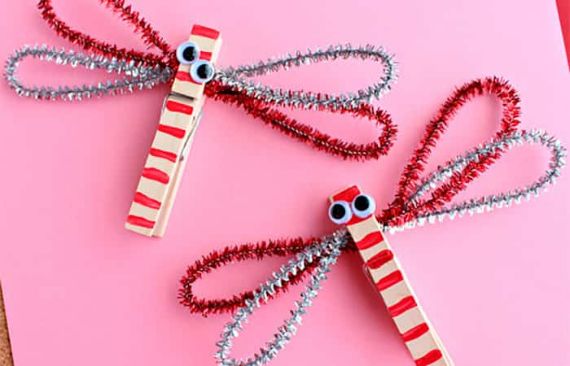
Clothespin Dragonflies
You will make this dragonfly made with wooden clothespin in a simple way. Enjoy having a great time with your children painting Clothespin Dragonflies in different colors, let them express their creativity through their imaginations.!
In the same way we used to make the airplanes wings made of EVA foam you can also use in these dragonflies, or made with a painted clip and some cardboard wings decorated with glitter, glued on top. To make them look fun we can glue some moving eyes on them.
Now your wooden clothespin dragonflies are ready! You can use them to decorate any corner of your house and let them “fly” around. Enjoy creating these beautiful dragonflies and adding a touch of creativity to your home decor!
Let Creativity Fly with Clothespins
Use your creativity and handmade skills to discover creative and practical ways fun clothespin crafts for kids or adults in your daily life you no longer use or have misplaced. Try different designs, from clothespin animals to superhero puppets, get inspired and start using wooden clothespins.
Let your imagination run wild as start making your own simple clothespin crafts for beginners or decorated clothespins for gifting. Design various clothespin crafts as they are simple, fun and most importantly inexpensive. These ordinary household items are of endless possibilities to make seasonal décor.


 Ideas for Wonderful Halloween day")
