


Looking for easy Halloween recipes to make with children? We’ve got you covered with meringue ghosts, skeleton cookies, stuffed pumpkins, and even sweet witch hats. These fun and spooky treats are perfect for celebrating this terrifying evening.
As October 31st approaches, it’s time to get into the Halloween spirit with decorations like zombies, ghosts, and creepy skeletons. And you don’t have to spend a lot of money – there are plenty of simple Halloween crafts and recipes that you can do with kids.
So why not try out these delicious and creative recipes to make your ‘trick or treat’ party even more special?
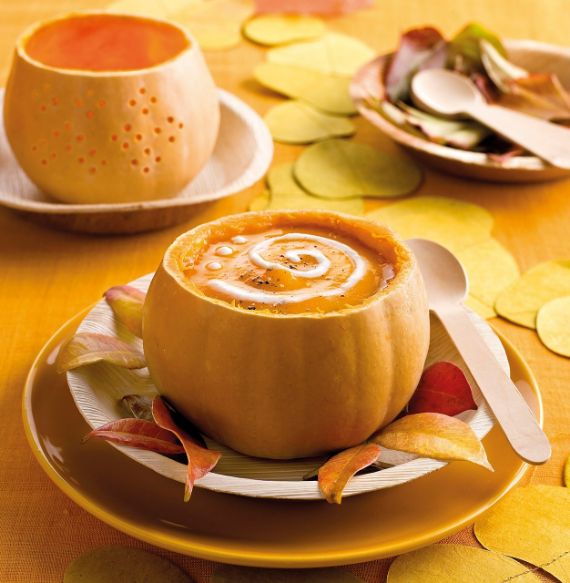
Pumpkin Velouté A Delightfully Creamy Halloween Treat
Elevate your Halloween lunch or dinner with the delightful charm of Pumpkin Velouté, a creamy concoction that will both impress and satisfy your family’s taste buds. This creative dish adds an element of surprise to your Halloween spread and can be prepared in just 35 minutes, serving 4. Here’s how to create this scrumptious treat:
Ingredients:
- 600 g of pumpkin pulp (from a 1 kg 800 g pumpkin)
- 1 onion
- 1 large potato
- 3 cups of chicken broth
- 4 tablespoons of grated Parmesan cheese
- 2 tablespoons of olive oil
- 100 ml of heavy cream
- A pinch of nutmeg
- Salt and pepper to taste
Step-by-Step Recipe:
Step 1: Start by peeling the potato and cutting it into small cubes. Dice the flesh of the pumpkin after removing its skin. Peel the onion and thinly slice it into julienne strips. Heat the olive oil in a saucepan and sauté the onion for around 4-5 minutes.
Step 2: Add the diced pumpkin and potato to the sautéed onion, letting them cook together briefly. Pour in the hot chicken broth and allow the mixture to gently simmer for approximately 20 minutes, until the pumpkin becomes tender. Remove the saucepan from heat and stir in the grated Parmesan cheese, a pinch of nutmeg, salt, and pepper.
Step 3: Transform the cooked ingredients into a velvety cream by blending until smooth. Incorporate the heavy cream and give it a thorough stir. Adjust the seasoning with salt and gently bring the mixture to a boil once more.
Serving Suggestion: To enhance the Halloween charm, serve your pumpkin velouté in hollowed-out gourds. Elevate its appearance and taste by garnishing with freshly ground pepper and artistic cream drops.
For those who prefer visual guidance, we provide step-by-step photos to ensure a seamless cooking experience.
With this pumpkin velouté recipe, you’ll not only amaze your family with the presentation but also tantalize their palates with the rich flavors of the season. Enjoy a spooktacular Halloween feast!
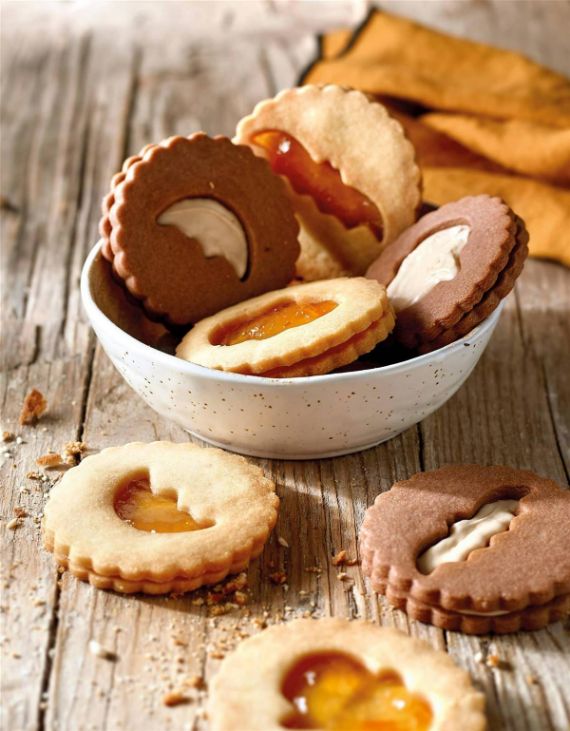
BATS AND OTHER HALLOWEEN FILLED COOKIES
BITE-SIZED FILLED BISCUITS Indulging both the young and the young-at-heart with a delightful treat, these Halloween-themed stuffed cookies bring a touch of whimsy to your dessert spread. While the suggested shape is that of bats, your creative imagination can run wild.
Preparation Time: 1 hour 10 minutes
Yield: 25 cookies
Ingredients:
- 250g butter
- 250g icing sugar
- 1 egg
- 600g flour
- 20g pure cocoa
- 2 tablespoons vanilla extract
- 100g orange marmalade
- 100g white chocolate cream
Instructions:
Step 1: Combine the butter and icing sugar until well mixed. Incorporate the egg, and once blended, add the sifted flour and vanilla extract. Divide the dough into two equal portions. Mix cocoa into one portion. Individually place each dough between sheets of baking paper and roll them out.
Step 2: Cut out cookies from the dough and arrange them on a baking sheet lined with parchment paper. For half of the cookies, use cookie cutters with distinct shapes and pierce the centers. Bake all the cookies in a preheated oven at 180ºC for 10-12 minutes. Once baked, allow them to cool.
Step 3: Spread orange marmalade over the whole cookies and white chocolate cream over the cocoa-flavored ones. Place the perforated cookies on top of the others, gently pressing them together. Your delectable treats are now ready to be savored.
Feel free to experiment with various shapes and fillings to suit different occasions and preferences. Enjoy your homemade filled biscuits!
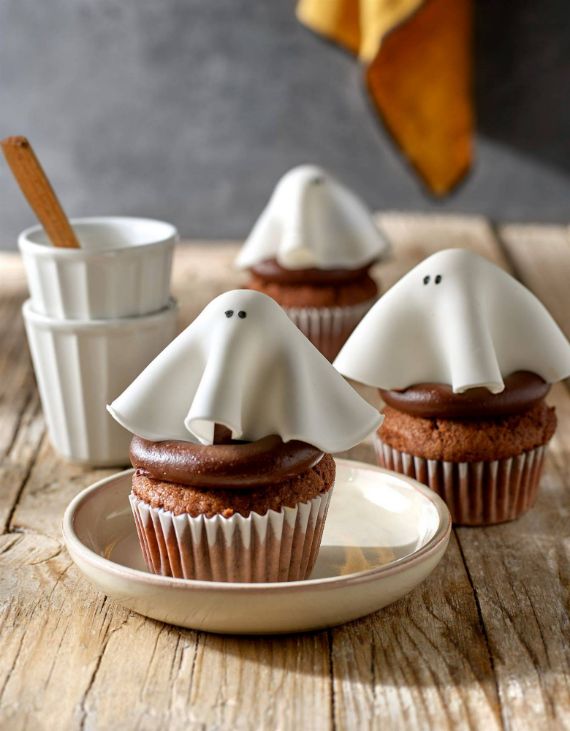
GHOST CUPCAKES
This Halloween, conjuring up eerie delights for your guests becomes a treat with these hauntingly delicious ghost cupcakes. Unleash your creativity with a dash of time and a skillful hand to craft these spooky confections. The recipe kicks off with cupcake creation, followed by a luscious layer of chocolate, and concludes with the formation of ghostly figures using fondant.
Preparation Time: 1 hour and 30 minutes
Yields: 14 cupcakes
Ingredients:
For the Cupcakes:
- 100g sugar
- 100g butter
- 2 eggs
- 30g unsweetened chocolate powder
- 50ml milk
- 100g all-purpose flour
- 100g chopped hazelnuts
- 5g yeast
For the Chocolate Cream:
- 200g heavy cream
- 200g dark chocolate (chopped)
For Assembling:
- 200g dark chocolate fondant
- 200g white fondant
- Black edible marker
Step-by-Step Guide:
Step 1: Commence by creaming the butter and sugar until soft and fluffy. Gradually incorporate the eggs, ensuring they’re well mixed after each addition. The mixture should become pale and thick.
Step 2: Sift the flour and yeast, then add the chocolate powder. Pour in the milk and blend, followed by folding in the chopped hazelnuts. Thoroughly combine until the mixture is uniform.
Step 3: Fill cupcake liners up to 2/3 of their capacity with the batter. Bake in a preheated oven at 180ºC (356ºF) for approximately 18 minutes. To determine doneness, insert a toothpick into the center; it should come out clean when removed.
Step 4: Prepare the chocolate cream by heating the heavy cream until it starts to boil. Remove from heat and whisk in the chopped chocolate until a smooth, velvety cream forms. Allow it to cool in the refrigerator, then whip it using a whisk until fluffy. Transfer the cream to a piping bag and generously cover each cupcake.
Step 5: Roll out the fondant with a rolling pin and cut out circles measuring about 12-14 cm in diameter using a cookie cutter. Sculpt these circles into ghost-like shapes and allow them to firm up. Once hardened, place them atop the cupcakes. Employ the black edible marker to create the eyes for an extra spooky touch. Now, your ghost cupcakes are ready to be enjoyed!
Summon your inner culinary spirit this Halloween and bewitch your guests with these delectable and playful ghost cupcakes.
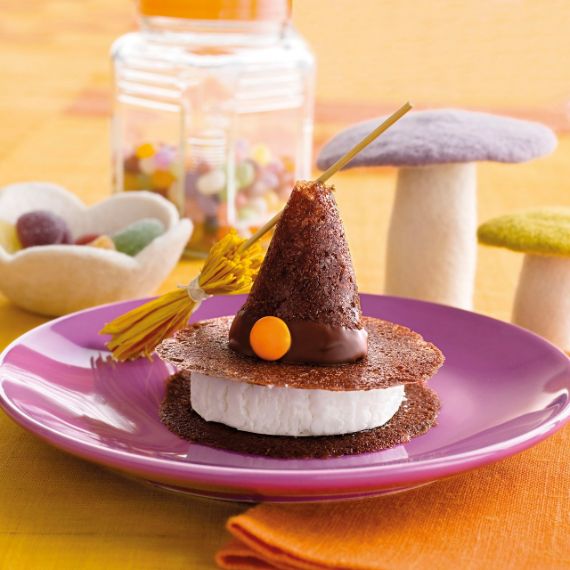
Cookie and Ice Cream Witch Hat Dessert
Preparation Time: 40 minutes Yield: 8 servings
Ingredients:
- 2 large egg whites
- 210g of sugar
- 50g of flour
- 2 tablespoons cocoa powder
- A pinch of salt
- 45g butter
- 2 tablespoons of whipping cream
- 1 teaspoon vanilla sugar
- 60g fondant chocolate
- 8 colored chocolate chips
- 1/2 liter of ice cream (vanilla or coconut)
Instructions:
- In a large bowl, combine the egg whites and sugar. Whisk them together until well mixed.
- Gradually add the sifted flour, cocoa powder, and salt to the egg white mixture. Continue to whisk until the ingredients are fully incorporated.
- Add the softened butter, whipping cream, and vanilla sugar to the mixture. Keep stirring until you have a smooth batter.
- Line a baking tray with parchment paper. Create 16 disks of dough on the parchment paper, each about 8 cm in diameter. Additionally, shape 8 half disks of dough which will form the hat hoods.
- Preheat the oven to 180°C (350°F). Bake the dough disks for 6-7 minutes or until they are lightly golden.
- While the half disks are still warm, gently lift them using a spatula and shape them into cone forms. Allow them to cool in this cone shape.
- Melt the fondant chocolate in a microwave or using a double boiler.
- Dip the cooled cone-shaped dough into the melted chocolate, ensuring the base is well-coated. Place each dipped cone onto a flat dough disk, forming the hat base.
- Decorate the chocolate-dipped cones with colored chocolate chips and sprinkles to create a whimsical witch hat appearance.
- Place a scoop of ice cream (vanilla or coconut) between two of the round dough disks to create the body of the dessert sandwich.
- Complete the witch hat dessert by gently placing a chocolate-dipped cone on top of the ice cream layer, creating the hat’s pointed top.
- If desired, you can serve the dessert immediately or place it in the freezer for a short while to firm up before serving.
Enjoy your delightful Cookie and Ice Cream Witch Hat dessert!
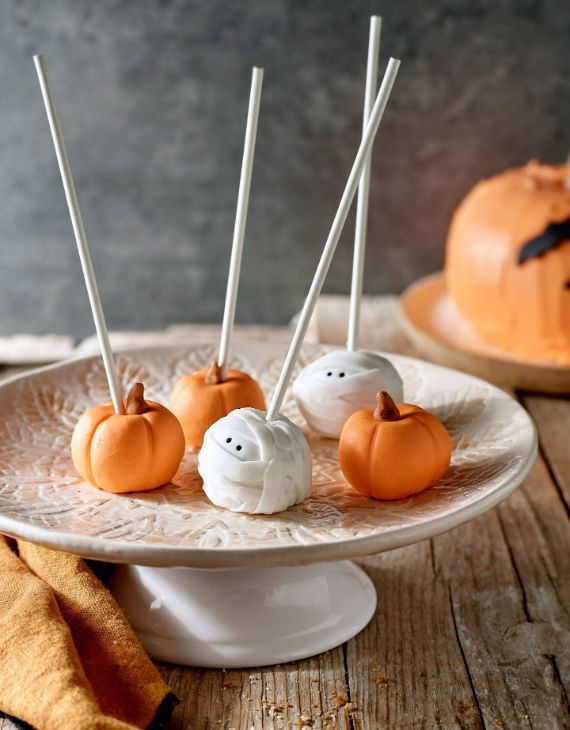
PUMPKIN MUMMY CAKEPOPS
Get ready to be both spooked and amused by these delightful cakepops in the shapes of pumpkins and mummies! This recipe is a perfect blend of fear and laughter, requiring only fondant and a pastry pencil to bring these eerie treats to life.
Preparation time: 40 minutes
Yields: 12-14 cakepops
Ingredients:
- 500 g of madeleines or sponge cake (any flavor)
- 50 g of cream cheese, softened
- 50 g of dark chocolate fondant
- 100 g of white fondant
- 100 g of orange fondant
- 20 g of brown or green fondant
- Black sugar marker
Step-by-step instructions:
Step 1: Begin by crumbling the cake or muffins using your hands, ensuring there are no large lumps. Add a teaspoon of softened cream cheese and start mixing. Gradually add more cream cheese as needed, kneading until the mixture forms a compact dough that isn’t dry.
Step 2: Take portions of the dough and roll them between your palms to create small balls, approximately 4 cm in diameter.
Step 3: Melt the dark chocolate fondant using a bain-marie method. Dip the tips of 12-14 sticks into the melted chocolate, then insert one stick into each cake ball. Place the cakepops you’ve made in the fridge for about 15-20 minutes to allow them to set.
Step 4: Roll out the orange fondant and gently cover half of the cake balls. Create grooves on the fondant to mimic the texture of a pumpkin’s skin. To complete the look, use the brown or green fondant to craft small stems and place them on top of the cakepops.
Step 5: Use a black sugar marker to draw faces on the pumpkin-covered cakepops to give them spooky expressions. You can experiment with different mummy and pumpkin designs for added fun.
With your artistic touch and a hint of creativity, these pumpkin mummy cakepops will surely become the center of attention at any Halloween or themed party. Enjoy the process of creating these treats that bring together the spirit of the season with a touch of laughter!
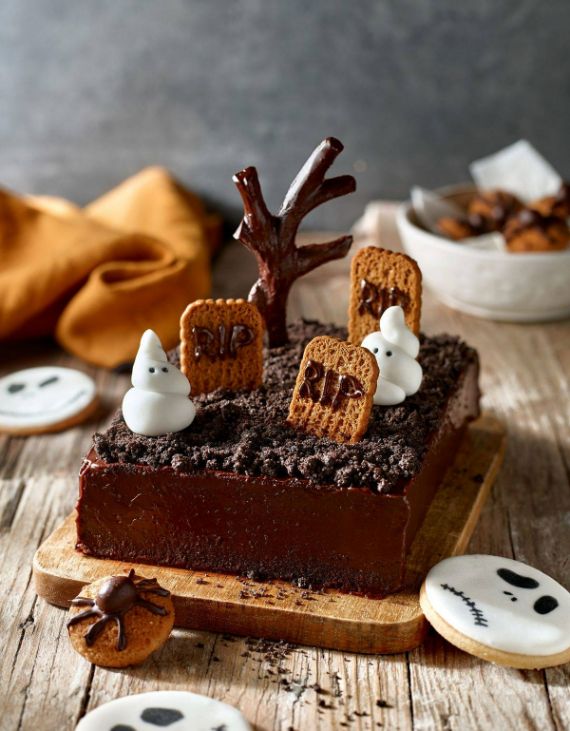
TERRIFYING CHOCOLATE CAKE
Indulge in the irresistible allure of this hauntingly delicious chocolate cake, perfect for a spine-chilling Halloween feast. This decadent recipe boasts a darkly delightful twist with cookies that resemble eerie graves, capturing the spirit of the season.
Preparation time: 1 hour 20 minutes
Serves: 10-12
Ingredients:
- 190g flour
- 200g sugar
- 35g pure cocoa
- 8g yeast
- 200g butter
- 4 eggs
- 100g chocolate cream
- 4-5 cookies
- Oil
- 100g rectangular Oreo cookies
- 150g dark couverture chocolate
- 100g dark chocolate fondant
- 100g white fondant
Step-by-step instructions:
Step 1: Begin by preheating your oven to 180ºC. Grease a square baking mold with oil, lightly dust it with flour, then invert and tap to remove excess flour.
Step 2: Moving on to the sugar, combine it with softened butter, beating until the mixture turns a creamy white. Gradually incorporate the eggs one by one, ensuring each is fully integrated before adding the next.
Step 3: Sift 180g of flour along with the yeast and cocoa. Add this dry mixture to the previous batter, blending until fully combined. Transfer the batter into the prepared mold and bake for 35-40 minutes. To determine readiness, insert a toothpick into the center – it’s done when the toothpick emerges clean.
Step 4: Once baked, remove the cake from the oven and let it cool on a wire rack. Gently release the cake from the mold and generously spread the chocolate cream over its surface.
Step 5: Crush the cookies to create a crumbly texture resembling soil, and cover the cake entirely with this “earthly” layer. Meanwhile, melt the dark couverture chocolate using a bain-marie. Once melted, transfer it to a pastry bag and craft letters on the rectangular cookies. These cookies, now resembling tombstones, can be placed upright on the cake’s surface.
Step 6: Fashion a tree using the dark chocolate fondant, and craft ghostly figures using the white fondant to embellish the cake.
Embrace the eerie allure of this masterpiece, capturing the essence of Halloween with each deliciously frightful bite.
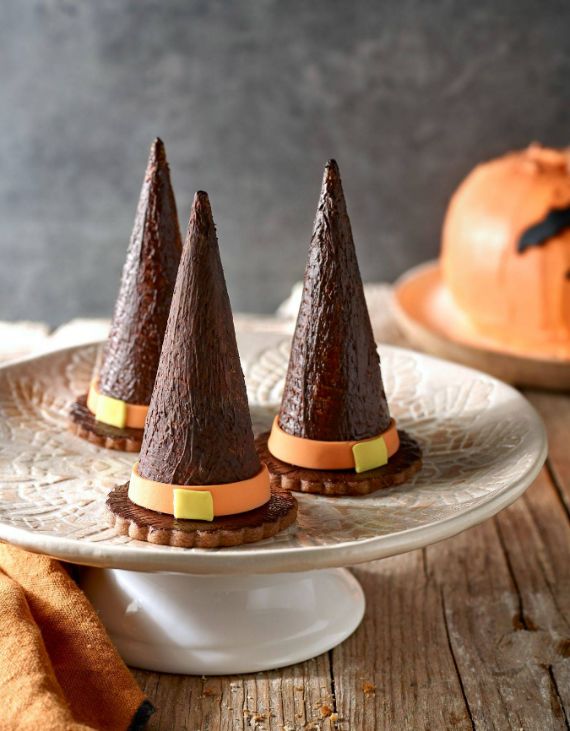
WITCH HATS
Sure, let’s dive into making these spooky yet delightful witch hats! This recipe will create 12 units of these eerie treats.
Preparation Time: 30 minutes
Ingredients for 12 units:
- 12 mini ice cream cones
- 50 g of yellow fondant
- 50 g of orange fondant
For the Base:
- 50 g of butter
- 100 g of flour
- 15 g of icing sugar
- 1/2 tablespoon of vanilla essence
- 150 g of dark chocolate fondant
- 50 g of chocolate chips
Step-by-step Recipe:
Step 1: Let’s get this enchanting cooking adventure underway! Begin by beating the softened butter together with the sugar. Following that, add the sifted flour, chocolate chips, and vanilla essence. Mix these ingredients until they form a consistent mixture that doesn’t stick to your hands.
Step 2: Place the dough between two sheets of baking paper and use a rolling pin to flatten it. Continue rolling until you achieve a sheet that’s approximately 5 mm thick.
Step 3: Employ a cookie cutter with grooved edges to cut out rounds of the same size from the rolled-out dough. Arrange these rounds on a baking sheet lined with parchment paper, ensuring they are spaced apart. Bake them for 12 minutes in a preheated oven at 180°C. Once baked, remove the cookies and allow them to cool.
Step 4: Roll out the orange fondant and proceed to cut 12 strips of consistent thickness. Use these strips to embellish the mouth of each ice cream cone, positioning them around the edges. Moving on to the yellow fondant, cut small rectangles to mimic buckles and place them on top of the cones.
Step 5: Melt the chocolate using a bain-marie method and then apply a thin layer of the melted chocolate onto the cookies. To finalize this enchanting creation, affix the cones atop the cookies and give them a finishing touch with a touch of color.
There you have it—your very own batch of terrifyingly sweet witch hats, ready to captivate taste buds and imaginations alike! Enjoy the spooktacular treats you’ve conjured up.
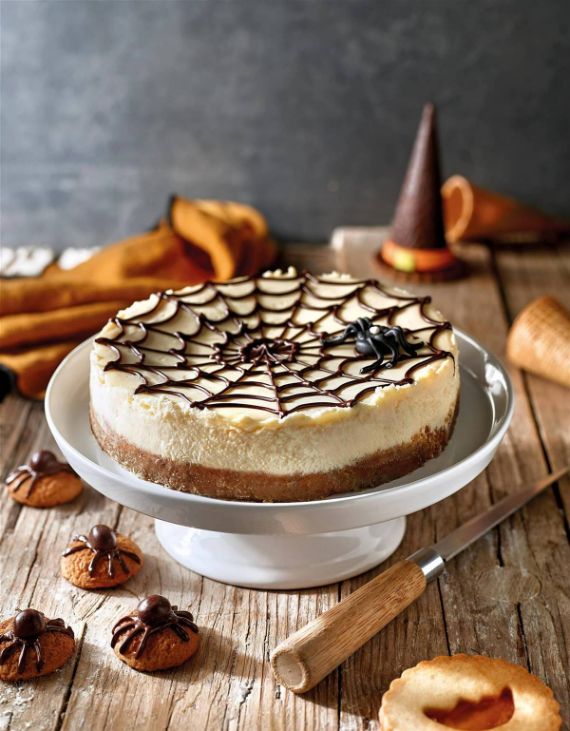
Classic Spider Web Cheesecake for Halloween Delight
Embrace the spirit of Halloween with a spine-chilling yet delectable treat – the Spider Web Cheesecake. This recipe promises not only a delicious dessert but also a memorable cooking experience for both you and your children. Follow the simple steps below to weave this spooky delight.
Preparation Time: 1 hour
Servings: 10-12
Ingredients:
- 200 g Digestive biscuits
- 150 g butter
- 900 g white spreadable cheese
- 170 g sugar
- 4 eggs
- 1 tablespoon vanilla extract
- 100 g dark fondant chocolate
- 20 g black fondant
Instructions:
- Prepare the Base:
- Preheat your oven to 150ºC (300ºF). Line the base of a 22-24 cm diameter removable cake tin with parchment paper.
- Crush the Digestive biscuits and mix them with the melted butter until well combined.
- Press the biscuit-butter mixture onto the base of the tin. Use a glass or spoon to firmly press it. Refrigerate for 20-25 minutes until the base sets.
- Create the Cheesecake Filling:
- In a mixer bowl, combine the spreadable white cheese, vanilla extract, and sugar. Mix on low speed until thoroughly blended, taking care not to overmix.
- Gradually add the eggs one at a time, gently incorporating each egg into the mixture.
- Pour the creamy mixture onto the prepared biscuit base in the tin.
- Bake and Chill:
- Place the cheesecake-filled tin into a larger baking pan. Add hot water to the larger pan to create a bain-marie.
- Bake the cheesecake in the preheated oven for 30-40 minutes until the edges are set, but the center remains slightly jiggly.
- Once baked, remove the cheesecake from the oven and let it cool slightly before transferring it to the refrigerator.
- Allow the cheesecake to chill for 10-12 hours in the fridge to ensure it sets properly.
- Decorate with Spider Web:
- Melt the dark fondant chocolate using a bain-marie. Let it cool slightly but remain pourable.
- Transfer the melted chocolate into a pastry bag. Begin drawing a spider web on the surface of the chilled cheesecake. Start by creating straight lines and then add the curved lines to form the intricate web.
- Craft the Spider:
- Knead the black fondant until pliable. Use it to sculpt a spider shape.
- Playfully place the fondant spider on the cheesecake, adding a delightful touch of Halloween whimsy.
Serve your masterpiece and watch the Halloween excitement unfold as you and your loved ones indulge in the spooky yet scrumptious Spider Web Cheesecake. Enjoy the eerie charm and irresistible taste of this holiday treat!
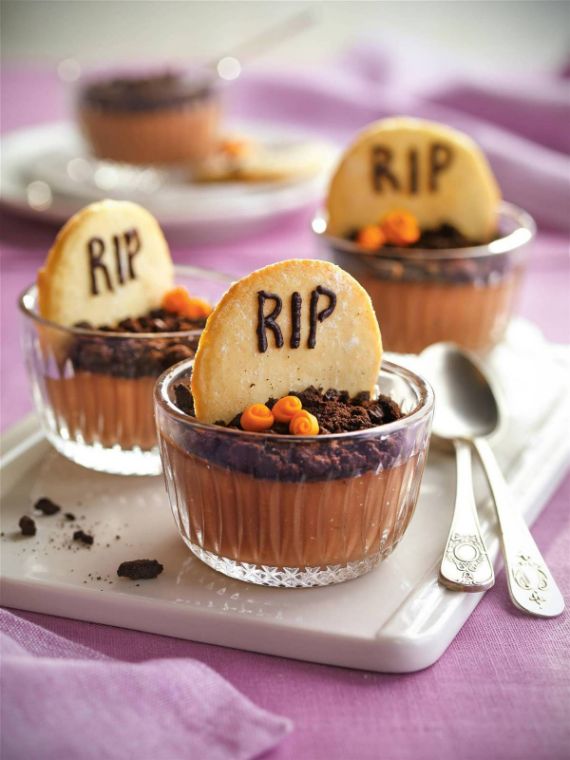
COOKIE AND CHOCOLATE GRAVES
COOKIE AND CHOCOLATE GRAVES Looking for simple Halloween recipes to enjoy with kids? Look no further! This recipe is a perfect choice, ensuring quick preparation to keep young ones engaged and excited. You’ll handle the more delicate tasks, such as cookie painting, while letting the kids have fun kneading, mixing, and crumbling. Get ready for a spooktacular Halloween experience!
Prep Time: 20 minutes
Yields: 6-8 servings
Ingredients:
- 200 ml whipping cream
- 500 ml milk
- 30g cocoa powder
- 55g cornstarch
- 50g sugar
- 1 teaspoon vanilla extract
- 1 package of cookies
- Chocolate sprinkles (for soil)
- 6 to 8 butter cookies
- Orange fondant flowers (for decoration)
- 1 chocolate-flavored pastry pencil
- Powdered sugar
Step-by-Step Guide:
Step 1. Create the cookie tombstones by writing “RIP” on the butter cookies using the pastry pencil. Dust them with powdered sugar and allow them to dry. In a saucepan, dissolve the cocoa powder, cornstarch, vanilla extract, and sugar in 150 ml of milk. Mix well and then add the remaining milk and whipping cream.
Step 2. Cook the mixture over medium heat while continuously stirring with a wooden spatula. Keep stirring until the mixture thickens and becomes a smooth cream. Once done, remove from heat and allow it to cool. While waiting, split the Oreo cookies in half and remove the cream filling. Crumble the cookies using your fingers.
Step 3. Gently pour the chocolate cream into glass cups, leaving some space at the top. Sprinkle the crumbled cookies over the chocolate cream to create a soil-like texture. Place a cookie tombstone into each glass, pushing it halfway into the cream. Enhance the presentation by adding orange fondant flowers as decorations. Refrigerate the cups until it’s time to serve.
Enjoy the chillingly delightful Cookie and Chocolate Graves dessert with your little ones at your Halloween gathering. Happy Halloween!
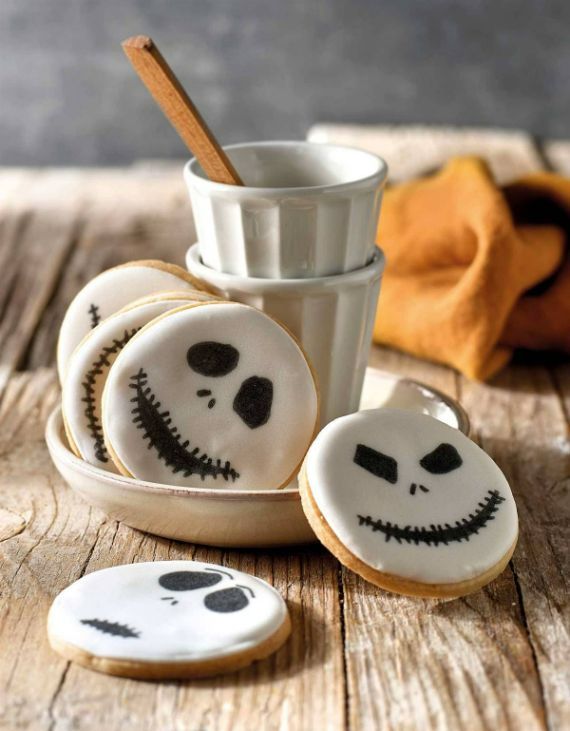
Haunted Night Cookies with Eerie Glaze
Add a spooky twist to your dessert table with these charming haunted night cookies! Perfect for Halloween festivities, crafting the ghostly faces requires a bit of finesse, and a pastry marker will be your best ally.
Preparation Time: 1 hour and 30 minutes Yield: 24 cookies
Ingredients:
- 100g butter
- 160g flour
- 50g powdered sugar
- 1 teaspoon vanilla essence
- 2 egg whites
- 500g powdered sugar
- 2 tablespoons lemon juice
- Black edible marker
Instructions:
Step 1: Start by placing softened and cubed butter in a mixing bowl. Add sifted flour, powdered sugar, and vanilla essence. Blend until you have a smooth, non-sticky dough. Put the dough between two parchment paper sheets and roll it out with a rolling pin.
Step 2: Utilize a circular cookie cutter, roughly 6-7 cm in diameter, to shape the cookies. Arrange the shaped cookies on a baking sheet lined with parchment paper. Preheat your oven to 180ºC (350ºF) and bake the cookies for around 10-12 minutes. Once baked, take them out of the oven and let them cool.
Step 3: Time to prepare the glaze. Whisk the egg whites with powdered sugar and lemon juice until you achieve a thick consistency. Transfer the glaze into a pastry bag fitted with a smooth tip.
Step 4: Gently lift the cookies off the parchment paper, being cautious not to break them. Spread a layer of glaze over each cookie using a spatula, ensuring uniform thickness on all sides. Allow the glaze to set and solidify, typically taking about 4-6 hours.
Step 5: Once the glaze is firm, it’s time to create the spookiness! Skillfully draw ghostly faces on each cookie using a black edible marker.
Your haunted night cookies are now ready to enchant and spook your guests at your Halloween get-together. Enjoy the artistic process, and remember to share the scares and smiles!
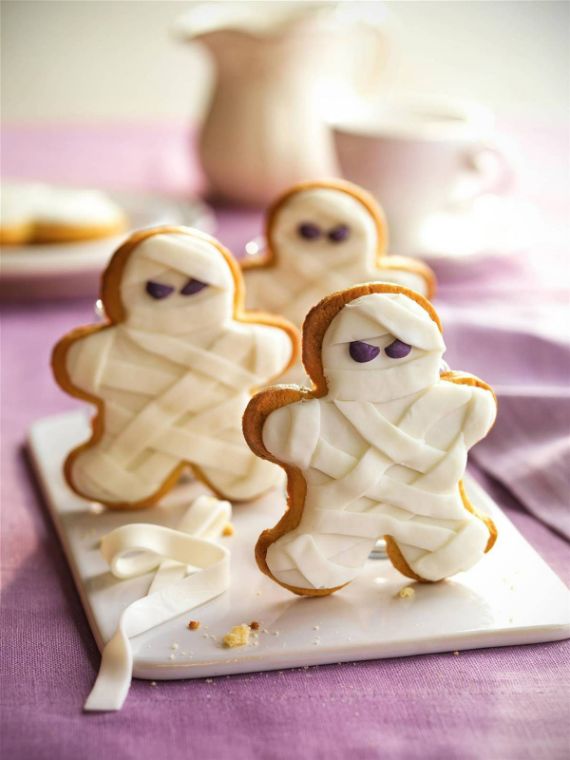
MUMMY-SHAPED COOKIES WITH FONDANT
Turn your Halloween treats into a playful and delicious experience with these mummy-shaped cookies! Enlist the help of young chefs in your household for a fun activity that results in spook-tacular snacks.
Preparation Time: 40 minutes
Yields: 12-14 cookies
Ingredients:
- 250g butter
- 250g sugar
- 1 egg
- 1 teaspoon vanilla extract
- Pinch of salt
- 500g flour
- 200g white fondant
- Violet gel or paste food coloring
Instructions:
Step 1: Cream the softened butter and sugar until smooth. Incorporate the egg, vanilla, flour, and salt, kneading until a consistent dough forms. Roll out the dough to a thickness of 6mm and chill it in the refrigerator for 30 minutes. Cut out the shapes using a gingerbread man cookie cutter.
Step 2: Bake the cookies in a preheated oven at 180ºC for 8-10 minutes. Allow them to cool. Take 20g of fondant and color it using the violet gel to create small eyeballs. Roll out the remaining fondant, using the same cookie cutter as before. Brush the fondant shapes with a bit of water and cover the cookies with them.
Step 3: Roll out the fondant and cut it into 5mm wide strips. Apply water to one side of the strips and affix them onto the fondant-covered cookies. Overlap and crisscross the strips to simulate bandages. Attach the fondant eyeballs with a small drop of water. Let the cookies dry before serving. Enjoy your adorable and delectable mummy cookies as a perfect Halloween snack!
COOKIE ICING SKELETONS
Skeleton Icing Cookies
Kids adore cookies, and when those cookies come in fun shapes with delightful frostings, they’re simply irresistible. These scrumptious skeleton-shaped cookies, resembling playful ghosts, are guaranteed to vanish in no time!
Preparation Time: 45 minutes (plus resting time)
Yields: 20-25 cookies
Ingredients:
For the Cookies:
- 125g butter
- 90g brown sugar
- 140g maple syrup (readily available in supermarkets, health food stores, and herbalists)
- 325g flour
- 2 teaspoons ginger powder
- 1 teaspoon baking powder
For the Glaze:
- 1 egg white
- 200g icing sugar
- A few drops of lemon juice
Step-by-Step Recipe:
Step 1: Begin by placing the softened butter in a bowl. Add the brown sugar and whisk vigorously until the mixture turns creamy. Incorporate the maple syrup, flour, ginger powder, and baking powder, and continue mixing until you achieve a smooth and consistent batter.
Step 2: Allow the mixture to rest, covered, in the refrigerator for 15 minutes. After resting, roll out the dough using a rolling pin. Cut out the cookies in the shape of little people (skeletons), and neatly arrange them on a baking tray lined with parchment paper. Bake the cookies in a preheated oven at 190°C for approximately 10 minutes.
Step 3: As the cookies cool down, prepare the glaze. Whisk the egg white and icing sugar together until they form a glossy glaze. Add a few drops of lemon juice for a touch of zesty flavor. Transfer the glaze into a small piping bag fitted with a mini smooth nozzle. Use this to elegantly decorate the surface of the cookies with your creative designs.
For a detailed visual guide of each step, make sure not to miss out! Your little ones will surely love these spooky yet delectable skeleton icing cookies.
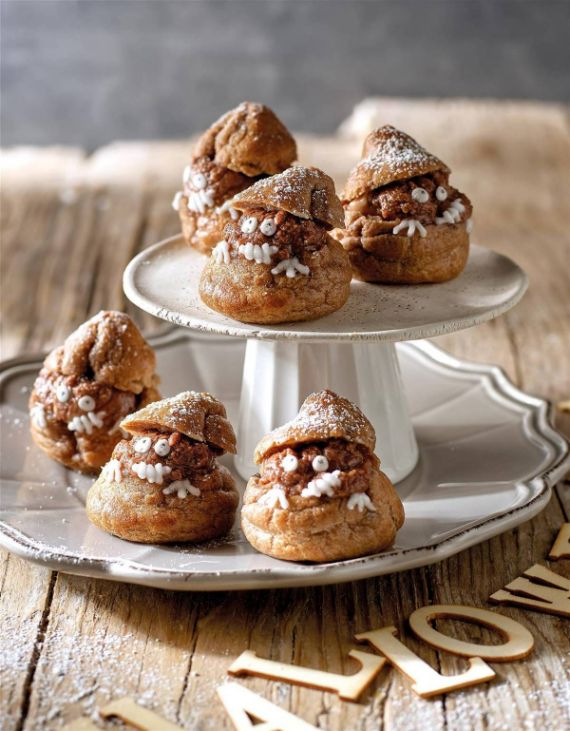
Chocolate and Mocha Ghost Profiteroles for Halloween Delights
Indulge in the delightful world of chubby ghost profiteroles that promise a mix of flavors for your Halloween celebrations. These treats, resembling adorable ghosts, conceal a luscious filling of chocolate and mocha that’s simply irresistible.
Prep Time: 1 hour 30 minutes
Yield: Makes 6-8 units
Ingredients:
For the Choux Pastry:
- 125ml milk
- 95g butter
- 115g flour
- 25g cocoa powder
- Pinch of sugar
- Pinch of salt
- 3 large eggs
For the Filling:
- 150g icing sugar
- 150g butter
- 2 tablespoons of coffee
- 50g white chocolate, melted
Instructions:
Step 1: Creating the Choux Pastry
- In a saucepan, combine 125ml of water, milk, and butter. Sprinkle in a pinch of sugar and a pinch of salt.
- Sift the flour and cocoa powder, then add them to the saucepan mixture. Cook and stir until the mixture forms a dough that pulls away from the sides of the saucepan.
- Remove from heat and continue stirring briefly to ensure a smooth consistency.
Step 2: Incorporating Eggs and Preparing the Dough
- Gradually add the eggs, one at a time, making sure each egg is fully incorporated before adding the next. This will ensure a consistent dough texture.
- The dough should be somewhat sturdy to avoid excessive puffing during baking. Allow the dough to rest for a few minutes before transferring it to a pastry bag.
Step 3: Baking the Profiteroles
- Line a baking sheet with parchment paper.
- Using the pastry bag, pipe small mounds of dough onto the parchment paper, spacing them apart to allow for expansion during baking.
- Bake the profiteroles in a preheated oven at 180°C (350°F) for 15-20 minutes, until they are golden and puffed up.
- Once baked, remove the profiteroles from the oven and let them cool. Once cooled, gently cut off the top to create lids for filling.
Step 4: Preparing the Filling and Decorating
- In a bowl, combine butter, icing sugar, and coffee. Mix until you achieve a smooth and creamy consistency.
- Fill the base of each profiterole with the prepared filling.
- Place the lids back on the profiteroles.
- Using melted white chocolate, create decorative details such as eyes, teeth, and little fingers on the profiteroles to give them their ghostly appearance.
These delightful Chocolate and Mocha Ghost Profiteroles are now ready to enchant and delight your Halloween festivities with their whimsical charm and delectable flavors.

Pumpkin Carrot Cake – A Whimsical Halloween Culinary Creation!
Prepare to astonish your guests with a culinary masterpiece that would earn accolades from seasoned chefs and delight Halloween enthusiasts alike – the Pumpkin Carrot Cake!
This cake not only captivates visually but also incorporates the wholesome goodness of carrots, making it a fantastic addition to your Halloween dessert array. With a touch of magical trompe l’oeil technique, this cake is set to steal the spotlight.
Preparation Time: 1 hour 40 minutes Servings: 10-12
Ingredients:
- 220g all-purpose flour
- 330g brown sugar
- 12g yeast
- 250g carrots
- 160ml light olive oil (or butter)
- 4 eggs
- ½ tablespoon ground cinnamon
- 50g shelled walnuts
- 50g black fondant
- 50g white fondant
- 50g brown fondant
For the Cream:
- 450g butter
- 500g icing sugar
- 1 tablespoon vanilla extract
- Orange gel food coloring
Step-by-Step Guide:
Step 1: Begin by preheating your oven to 180ºC. Grease a 15 cm tart pan with butter and lightly dust it with flour. Wash and thoroughly dry the carrots, then grate them. Also, finely chop the walnuts.
Step 2: In a mixing bowl, whisk the eggs together with the sugar and oil until the mixture becomes pale and fluffy. Gradually add 115g of sifted flour along with the yeast, creating a smooth batter. Incorporate the chopped walnuts, grated carrots, and ground cinnamon, mixing everything thoroughly.
Step 3: Transfer the prepared batter into the greased tart pan. Bake for approximately 40-45 minutes or until a toothpick inserted into the center emerges clean. After baking, allow the cake to cool on a wire rack. Once cooled, remove it from the pan and carve the cake to resemble a rounded pumpkin shape.
Step 4: For the cream, whip the butter, icing sugar, and vanilla extract until achieving a velvety-smooth consistency. Infuse the cream with a hint of orange gel food coloring, ensuring it’s evenly blended. Use this tinted cream to generously coat the entire cake.
Step 5: Roll out the black and white fondant. Utilize Halloween-themed cookie cutters to craft shapes like bats and ghosts from the fondant. Playfully arrange and adhere these shapes onto the cake, conjuring a playful and eerie atmosphere. Additionally, mold the brown fondant into a strip, roll it, and position it at the cake’s center to mimic a tail.
With these uncomplicated steps, you’ll craft a breathtaking Pumpkin Carrot Cake that seamlessly blends imagination, flavors, and the essence of Halloween in each delectable bite. Revel in the admiration of your guests as they relish this enchanting trompe l’oeil masterpiece!
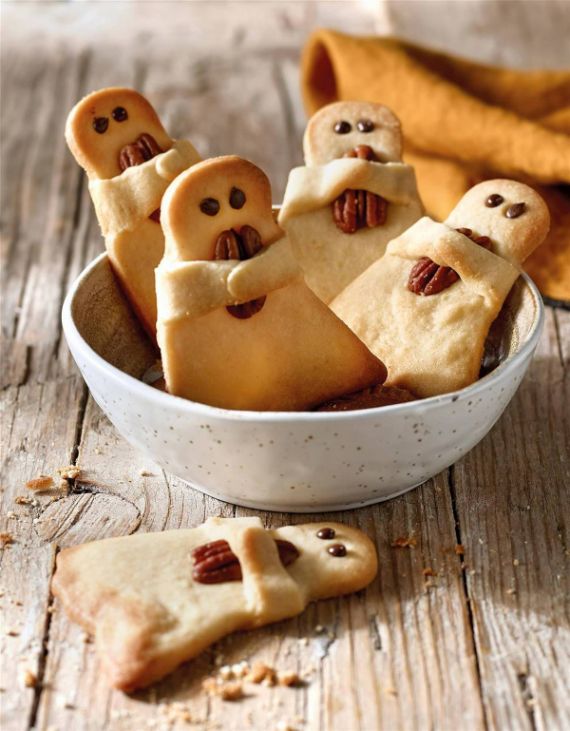
COOKIE GHOSTS
Ghostly Delights Cookies
Add a touch of spookiness to your Halloween celebrations with these Ghostly Delights Cookies. These charming treats are perfect for the season, and you can even get creative by shaping them into various fun characters. Follow this easy recipe and let the Halloween fun begin!
Preparation Time: 1 hour
Yield: 45-50 cookies
Ingredients:
- 250g butter
- 250g icing sugar
- 600g all-purpose flour
- 1 egg
- A handful of chocolate chips
- 2 tablespoons vanilla extract
- 50g pecan nuts
Instructions:
Step 1: Creaming the Base
- In a mixing bowl, combine the butter and icing sugar. Mix until they are well blended and creamy.
- Add the egg to the mixture and incorporate it thoroughly.
- Gradually add the sifted flour and vanilla extract to the bowl. Mix until the ingredients come together to form a smooth, non-sticky dough.
Step 2: Shaping the Cookies
- Place the dough between two sheets of parchment paper and roll it out using a rolling pin. The dough should be about 1/4 inch thick.
- Use ghost-shaped cookie cutters to cut out portions of the dough. Arrange the cut-out cookies on a baking sheet lined with parchment paper.
- Take a pecan nut and gently press it into the center of each cookie, creating the impression of a ghost holding the nut. To give your ghosts character, fold the sides of the dough to create arms.
- Use a skewer or a small tool to create eyes for the ghosts. A couple of small indentations will do the trick.
Step 3: Baking and Final Touches
- Preheat your oven to 180°C (350°F).
- Place the baking sheet with the shaped cookies in the preheated oven and bake for 10-12 minutes. The cookies should turn a light golden color around the edges.
- Once baked, remove the cookies from the oven and let them cool on a wire rack.
- When the cookies are completely cooled, add a chocolate chip into each of the eye indentations. This gives your ghostly creations a playful and endearing appearance.
- Once the chocolate chips are in place, your Ghostly Delights Cookies are ready to be enjoyed. Serve them at your Halloween party or share them with friends and family to spread the spooky delight!
These cookies are not only delicious but also a delightful addition to your Halloween-themed treats. Feel free to experiment with different shapes and decorations to make these cookies uniquely yours. Happy baking and Halloween fun!
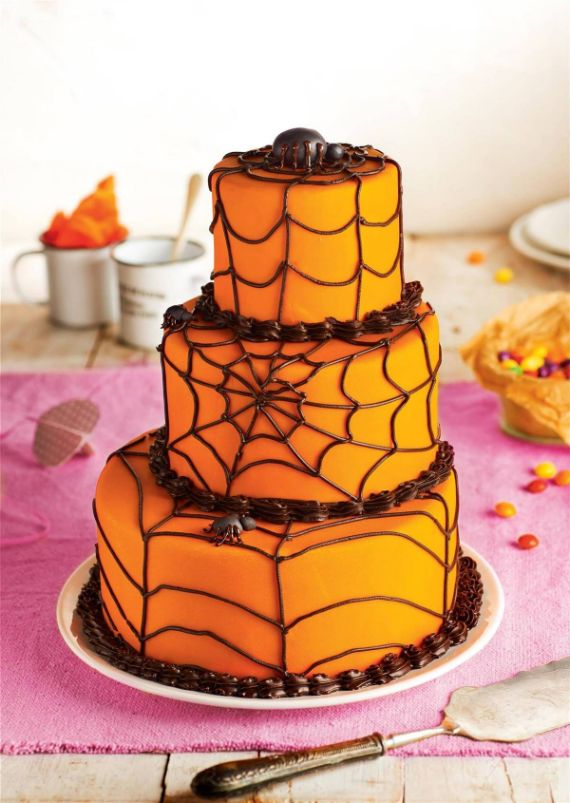
HALLOWEEN CAKE WITH COCOA CREAM
Indulge in the essence of Halloween with this decadent dessert masterpiece, tailored for grand gatherings. Should you desire a more intimate feast, the recipe can be easily downsized, eliminating any surplus – a true luxury indeed!
Preparation Time: 3 hours
Serves: 25 people
Ingredients:
For the Cake:
- 375g flour
- 3 heaped teaspoons of baking powder
- 245g butter
- 330g sugar
- 12 eggs
- A pinch of salt
For Filling and Decoration:
- 200g cocoa cream with hazelnuts
- 1 kg orange fondant
- Powdered sugar
- 200g whipping cream
- 200g chocolate fondant
- A few drops of black food coloring
Step-by-Step Instructions:
Step 1: Begin by separating the egg whites from the yolks. Whip the egg yolks with the sugar, and incorporate 240g of softened butter. Gradually add the sifted flour and baking powder. In a separate bowl, whip the egg whites with a pinch of salt until they form stiff peaks. Gently fold one-third of the whipped egg whites into the batter, and then fold in the remaining two-thirds.
Step 2: Grease three distinctively sized cake molds (diameters: 24cm, 18cm, and 10cm) with butter. Pour the batter into the molds and bake in a preheated oven at 180ºC. The small cake needs about 30 minutes, the medium-sized cake requires around 40 minutes, and the large cake bakes for approximately 45 minutes. Once done, allow them to cool and then carefully remove them from the molds.
Step 3: After the cakes have cooled down, trim the tops to create flat surfaces. Proceed to horizontally slice each cake in half. Generously spread cocoa cream with hazelnuts between the layers.
Divide the orange fondant into three portions, and then roll them out using a dusting of powdered sugar to prevent sticking. Gently drape the fondant over each cake layer. Stacking the cakes, use cocoa cream to adhere them together.
Step 4: For the crowning touch, meld chopped chocolate fondant and hot whipping cream. Once blended, introduce the black food coloring and mix well before allowing the mixture to cool. Transfer the mixture into a piping bag with a sleek nozzle.
Create intricate cobweb designs on the cakes. Decorate the base of each cake using a fluted tip, adding an extra touch of flair.
Embrace the spirit of Halloween with this cocoa cream delight, uniting rich flavors and artistic finesse to create a truly bewitching dessert that will captivate your senses.
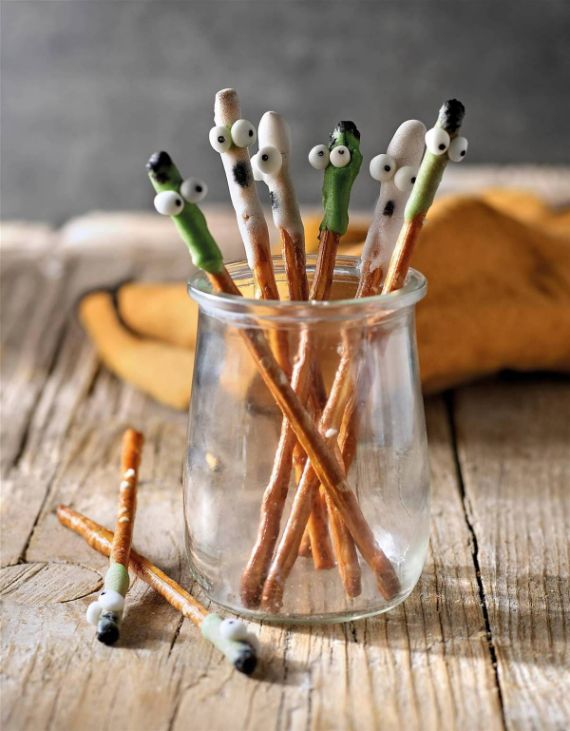
Spooky Monster Pretzel Treats
Looking to add a touch of spookiness to your Halloween dinner? These Monster Pretzel Sticks are the perfect treat! Whether you’re serving them as a snack or a dessert, these creepy yet delightful treats are sure to be a hit. And the best part? They’re super easy to make and won’t take up too much of your time.
Preparation Time: 40 minutes
Yield: 26-30 units
Ingredients:
- 1 package of elongated pretzels
- 20 g white fondant (plus an additional 2 g for eyes)
- 400 g icing sugar
- 2 tablespoons lemon juice
- 2 tablespoons green food coloring
- 2 tablespoons black food coloring
Instructions:
Step 1: In a mixing bowl, combine egg whites, icing sugar, and lemon juice. Beat the mixture until it forms a smooth glaze. Divide the glaze into three parts: one for white (ghosts), one for green (Frankensteins), and one for black (hair and eyes).
Step 2: Dip half of each pretzel stick into the white glaze and the other half into the green glaze. Allow the glaze to dry. For the green pretzels, dip the end lightly into the black glaze to create a “hair” effect. Then, using a toothpick, carefully draw mouths and scars on the forehead of the green pretzels.
Step 3: Shape two small balls out of the white fondant and stick them together to form eyes. Use food coloring to paint the eyes onto each fondant pair.
These Monster Pretzel Sticks are now ready to be enjoyed! They’re a fantastic addition to your Halloween celebrations, adding a playful and spooky touch to your dinner. So go ahead and indulge in these eerie yet delicious treats. Happy Halloween!
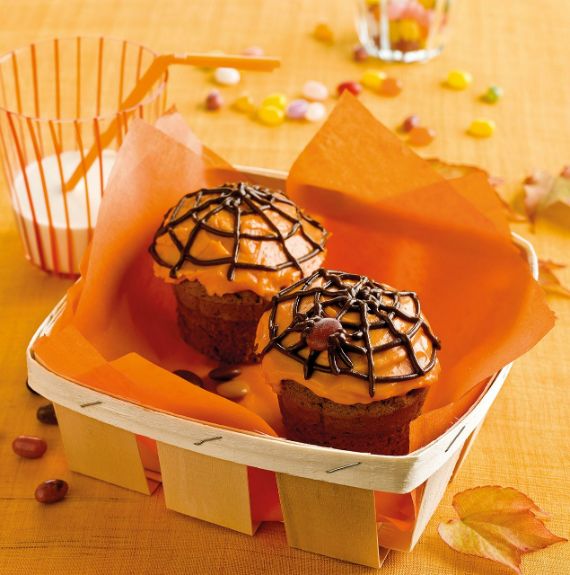
CHOCOLATE MUFFINS WITH SPIDER WEB
Elevate your traditional cupcakes with a touch of “terrifying” flair – these spider web chocolate muffins are not only easy to create but also delightfully captivating.
The straightforward process yields a visually striking and appetizing result, bound to captivate anyone who sets their eyes on them. These treats are so irresistibly delicious, you might just find yourself ensnared in their allure.
Preparation Time: 1 hour
Ingredients for 12 servings
For the Muffin Batter:
- 1 cup yogurt
- 3 eggs
- 2 ½ cups flour
- 1 ½ cups sugar
- 1/3 cup light olive oil
- 1 packet of baking powder
- 1 tablespoon grated orange zest
- 4.4 oz (125g) fondant chocolate
- 1 tablespoon butter
For the Topping:
- 3 ½ tablespoons butter
- 4 oz (110g) cream cheese, softened
- 1 ¼ cups icing sugar
- Food coloring (orange and brown)
Step-by-Step Recipe
Step 1: Begin by whisking the eggs and sugar until well combined. Add in the yogurt, oil, and sifted flour along with the baking powder. Introduce the melted fondant chocolate and grated orange zest to the mixture. Fill greased cupcake molds, filling each about 3/4 full.
Step 2: Bake the cupcakes in a preheated oven at 320°F (160°C) for approximately 20 minutes. While the cupcakes are baking, focus on preparing the delectable topping. Cream the softened butter and icing sugar together, gradually incorporating the cream cheese and continuing to beat the mixture. For an exciting twist, divide about 3/4 of the mixture and tint it with orange food coloring.
Step 3: Once the cupcakes are cool, generously spread the orange-tinted cream over each one. Now, add brown food coloring to the remaining cream mixture, creating a rich brown hue. Use this to artfully fashion spider web designs on the cupcake’s surface. To up the spookiness factor, consider adding a brown dragee as a creative touch, mimicking a spider.
With these enticing spider web chocolate muffins, you’re not just baking, you’re crafting a culinary masterpiece that seamlessly blends the eerie and the delightful. Your friends and family will be spellbound by both the flavor and the presentation of these delectable treats.

MINI MERINGUE GHOSTS
These delightful mini meringue ghosts are not only easy to create but also incredibly tempting. Instead of just sending shivers down your spine, these ghost-shaped treats will have you reaching for more. And don’t worry, they’re perfectly lifeless in taste!
Preparation Time: 50 minutes (plus resting time)
Yield: 30 units
Ingredients:
- 150 g of egg whites (approximately 4 eggs)
- 220 g of sugar
- 1 teaspoon of white vinegar
- Silver sugar pearls
Step-by-Step Recipe:
Step 1: Begin by pouring the egg whites into a spacious bowl. Employ an electric whisk to whip them until they attain stiff peaks. Gradually introduce the vinegar and sugar while continuing to whisk, until the mixture transforms into a luscious, glossy meringue.
Step 2: Transfer the meringue into a pastry bag fitted with a smooth nozzle, approximately 7 mm wide. On a baking tray lined with parchment paper, form 30 ghost-like mounds by gently squeezing the pastry bag.
Enhance each ghost’s appearance by adding two sugar pearls to simulate their eyes.
Step 3: Slide the baking tray into an oven preheated to 120 °C (248 °F) and let the meringue ghosts bake for 25 minutes. Afterward, turn off the oven and leave the ghosts inside for an additional 30 minutes. Store these ethereal treats in an airtight tin box until you’re ready to savor them.
These mini meringue ghosts are sure to cast a spell on your taste buds, making them an irresistible treat that’s more charming than chilling!
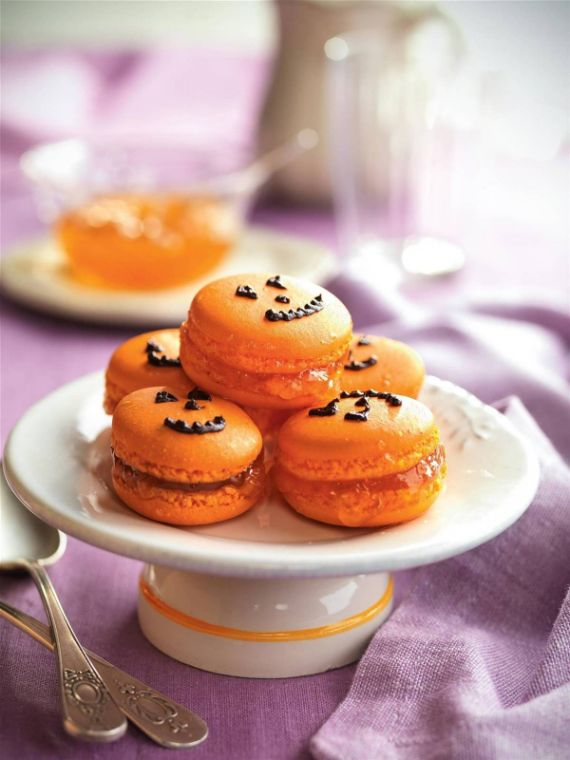
HALLOWEEN MACAROONS
Indulge in the delectable charm of this Halloween macaron recipe. With a hint of orange essence, these treats capture the iconic seasonal hue while delivering delightful flavors. Note that planning ahead is essential, as the egg whites require a few days of chilling. Yet, the process remains effortlessly simple.
Preparation Time: 30 minutes
Yield: 8-10 macarons
Ingredients:
- 200g icing sugar
- 120g ground almonds
- 3 egg whites
- 30g sugar
- Orange marmalade
- Orange gel food coloring
- 1 chocolate-flavored pastry pencil
Step-by-Step Guide:
Step 1: Prepare the egg whites in advance, about 2 to 3 days ahead. Place them in a bowl, cover with cling film, and lightly pierce the film with a knife tip. Let them rest in the refrigerator.
Retrieve the egg whites 2 hours before usage and allow them to reach room temperature. Sift the icing sugar and ground almonds into another bowl, repeating this process twice.
Step 2: Preheat your oven to 150ºC. Whisk the egg whites vigorously with the sugar until they form stiff peaks. Combine the egg white mixture with the sifted almond mixture, adding the orange gel food coloring to achieve the desired hue.
Gently blend the ingredients. Transfer the resulting dough into a pastry bag equipped with a smooth nozzle. Pipe 4 cm diameter discs onto a baking sheet lined with parchment paper.
Step 3: Allow the dough discs to rest until a dry surface forms. Lower the oven temperature to 130ºC and bake the macarons for approximately 17 to 18 minutes. Once done, remove from the oven and let them cool.
Step 4: Assemble the macarons by spreading a layer of orange marmalade on one half and then topping it with the other half.
Step 5: Embrace the Halloween spirit by adding a touch of personality to your macarons. With the chocolate-flavored pastry pencil, craft whimsical eyes, noses, and mouths on the macarons to transform them into spooky characters.
Serve these enchanting Halloween macarons to add a dash of playful elegance to your seasonal celebrations.
On the evening of October 31, if a group of children dressed as eerie characters approach your doorstep and say “trick or treat,” it’s recommended to give them candy, treats, or sweets to prevent them from playing spooky pranks. Otherwise, you might find yourself on the receiving end of spooky tricks from kids dressed as zombies, witches, skeletons, ghosts, or vampires!
Halloween is a night of enigma and fear, originally a Celtic festival now observed in various parts of the world, particularly in Anglo-Saxon countries like Canada, the United States, Ireland, and the United Kingdom.
The Celts believed that on this night, departed souls would come to homes, and in order to ward them off, they would leave food or sweets outside their doors. Let’s partake in the festivities and take this chance to create eerie recipes that will astonish and delight everyone.


 Ideas for Wonderful Halloween day")
