


Paper weaving is a delightful and imaginative craft activity for kids that not only brings joy but also enhances their fine motor skills and sparks their creativity. It involves weaving strips of paper together to create beautiful patterns and designs. This versatile technique allows kids to make a variety of decorative items such as baskets, mats, coasters, bookmarks, and even three-dimensional sculptures. By engaging in paper weaving, children can unleash their creativity and explore a wide range of colors and textures using simple materials that are easily accessible. It’s a fun-filled experience that encourages self-expression and hands-on exploration.
DIFFERENT VARIATIONS TO PAPER WEAVING
Paper weaving offers a plethora of captivating variations that can unlock new creative possibilities. Let’s explore some of these exciting variations:
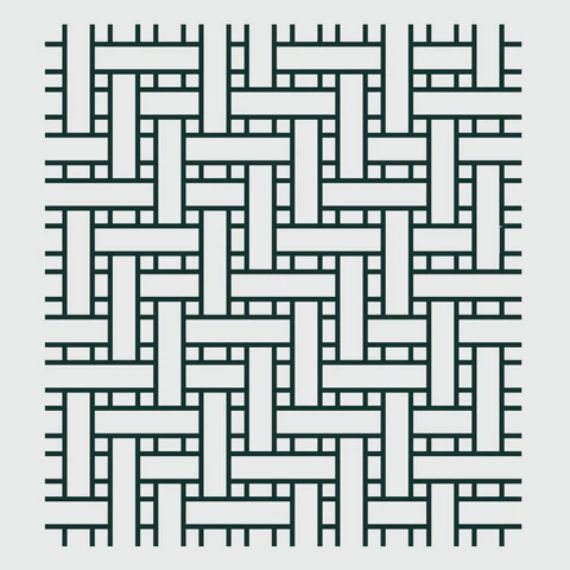
- Traditional paper weaving, sometimes referred to as fundamental over-under weave, is a well-liked and age-old method. It entails weaving paper strips together in an over-under pattern. Start by weaving the first strip over the base strip, then the second strip beneath the first, the third strip over the second, and so on. After finishing, reverse the process for the following row. You may produce a wide variety of aesthetically pleasing effects by using paper in different colors, widths, and textures.
- Overlapping Paper Weaving: Rather than strictly following the conventional approach, you can overlap the paper strips to produce layered designs, which brings depth and dimension to your woven artwork.
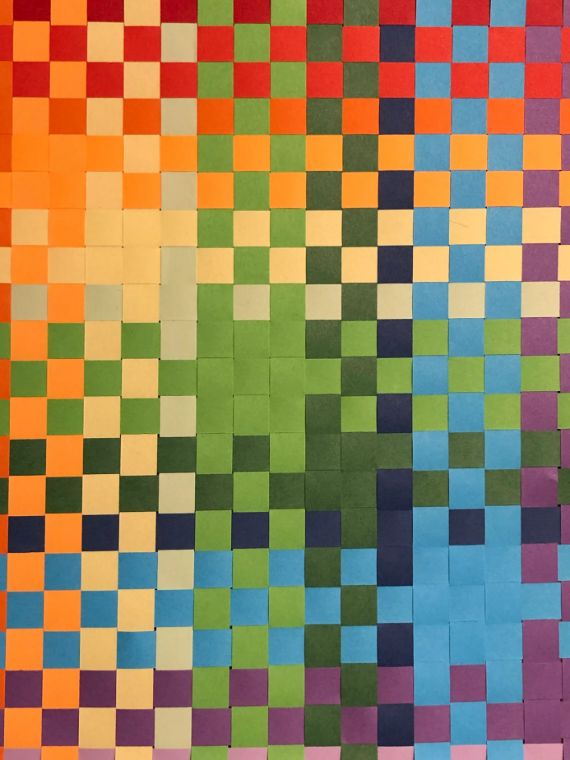
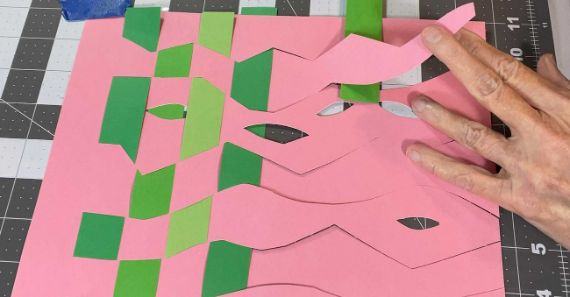
- Diagonal Paper Weaving: Try out diagonal weaving instead of the more conventional vertical or horizontal weaving. You can produce eye-catching patterns and unique effects with this method. This design gives your weaving an intriguing diagonal component. The first strip should be woven from the top left corner to the bottom right, and the second strip should be woven from the top right corner to the bottom left. For each row, alternate between these two diagonal directions.
![]()
- Chevron Weave: To create a zigzag pattern using the Chevron Weave technique, begin by weaving the first strip over the base strip. Then, weave the second strip under the base strip. Continue this alternating pattern by weaving the third strip over the fourth strip, and so forth. In the next row, reverse the pattern by weaving under the first strip, over the second strip, under the third strip, and so on. Repeat these two rows consistently to achieve the chevron design.

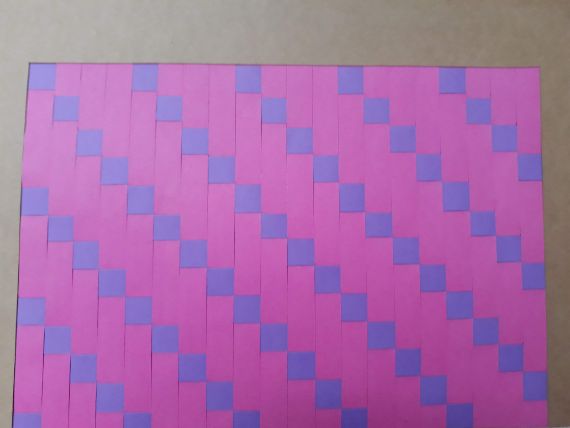
- Twill Weave: This pattern creates a diagonal line design similar to twill fabric. Start by weaving the first strip under the base strip, then over the second strip, under the third strip, and so on. In the next row, shift the pattern by weaving over the first strip, under the second strip, over the third strip, and so on. Repeat these two rows to create the twill pattern.
- Herringbone Weave: The distinctive V-shaped pattern of the herringbone weave gives it away. Start by weaving the first strip under the base strip, then over the second strip, under the third strip, and so on in an alternating pattern to produce this design. Reverse the pattern in the following row by weaving the first strip under, the second strip over, the third strip under, and so on. The herringbone pattern is created by repeating these two rows.
- Curved Paper Weaving: Discover the beauty of curved lines through the art of paper weaving. By skillfully bending paper strips into arcs or circles, you can explore the captivating world of curved paper weaving. This technique adds a dynamic and fluid element to your designs, allowing you to craft organic and flowing shapes with ease.
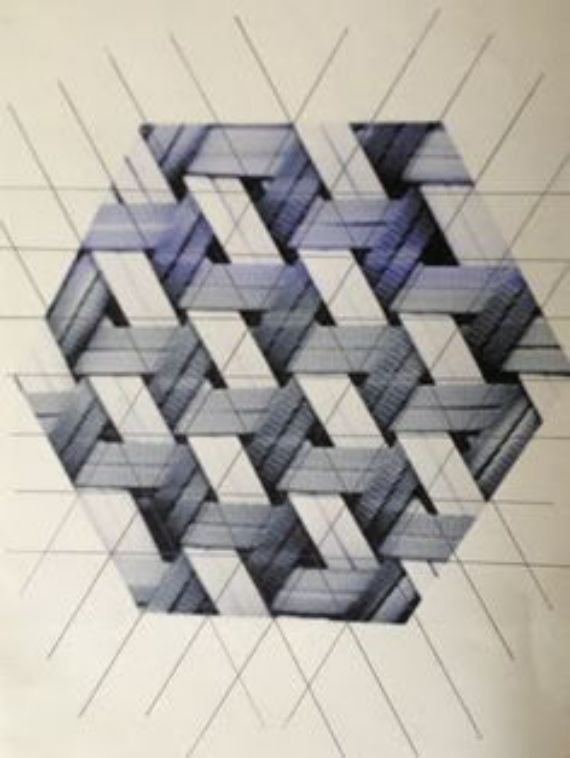
- Triangular Paper Weaving: Triangular Paper Weaving: Transform your paper strips into triangles and interlace them to create captivating geometric patterns. This variant unlocks a realm of possibilities for crafting elaborate tessellating designs.
- Mixed Media Paper Weaving: Combine paper weaving with other materials such as fabric, ribbon, yarn, or found objects like beads or feathers. This fusion of different textures and materials expands the creative horizon and offers unique outcomes. via drip.
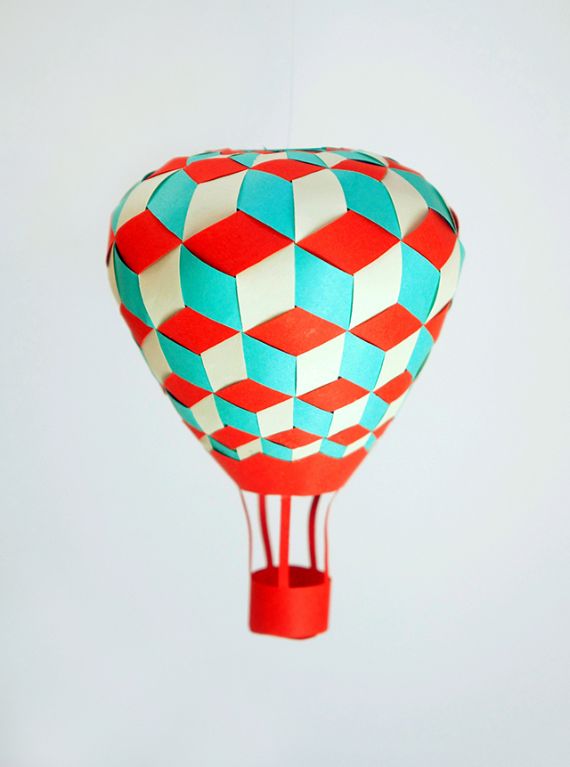
- Three-Dimensional Paper Weaving: Elevate your paper weaving to the next level by constructing three-dimensional forms. Weave multiple layers of paper to build height and create sculptures, baskets, or textured objects.
- Experimental Techniques: Embrace innovative approaches by venturing beyond conventional materials and techniques. Utilize translucent or patterned papers to create unique lighting effects. Explore the use of unconventional tools such as needles or toothpicks for weaving.
Explore and embrace a wide range of possibilities when it comes to creating mixed media paper weavings. Experiment with different colors, widths of paper strips, and combinations of patterns to craft unique and visually appealing artworks.
Let your creativity shine by incorporating various techniques and modifying them to suit your artistic vision. Embrace the versatility of paper weaving and create captivating and original pieces of art.
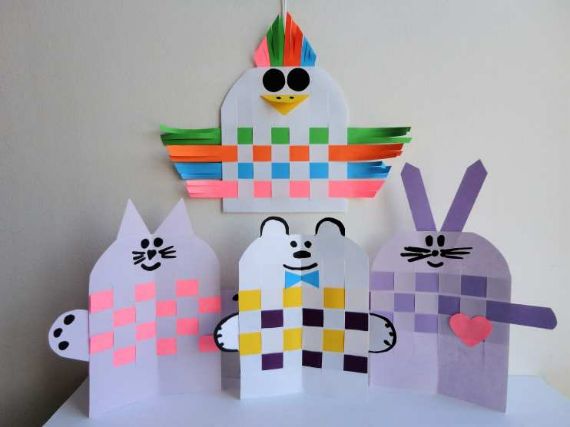
1-Paper weaving “Funny animals” crafts for kids
Paper weaving is an enjoyable and imaginative craft activity for children that enhances their fine motor skills and sparks creativity. Making “Funny Animals” through paper weaving is an engaging hands-on project. Follow these step-by-step instructions to create your own paper woven animals:
Materials needed:
Colored construction paper or cardstock in various colors
Scissors
Pencil
Glue stick or craft glue
Googly eyes (optional)
Markers or crayons (optional, for additional decoration)
Instructions:
- Choose an animal and select colored paper that matches its features. For instance, brown for a bear, orange for a tiger, or black and white for a zebra.
- Draw the animal’s body shape on a sheet of construction paper or cardstock. Keep it simple and easy to weave through. Cut out the body shape using scissors.
- Take a different colored sheet of paper and cut it into thin strips, approximately 1 inch wide. Prepare several strips based on the animal’s size.
- Fold one strip lengthwise to make it thinner. Apply a small amount of glue to one end of the folded strip to hold it in place.
- Starting at one end of the animal’s body, weave the folded strip of paper over and under the body shape. Ensure the paper is tightly secured and lies flat against the body. Continue weaving until you reach the other end of the body shape.
- Take another strip of paper and repeat the weaving process, starting where the previous strip ended. Repeat this step with additional strips until the entire body is covered with woven paper strips.
- Trim any excess paper strip ends that protrude beyond the body shape.
- Once the weaving is complete, you can add more details to the animal using colored paper or markers. Cut out ears, paws, or a tail from different colored paper and attach them to the body with glue. Draw facial features or attach googly eyes to give the animal a playful appearance.
- Allow the glue to dry completely before displaying or playing with the paper woven animal.
- Repeat the process to create more funny animals using different colors and animal shapes.
Crafting “Funny Animals” through paper weaving is an enchanting way to introduce children to weaving while nurturing their imagination. Enjoy the process and have fun building a collection of vibrant animal characters!
“Funny weaving”, weaving from paper strips
Cut the paper into strips of equal width and length. You can use various types of paper, such as newspaper, illustrated magazines, or wrapping paper.
Take a pencil and hold it at a slight angle. Begin winding one strip of paper around the pencil, making sure each new strip slightly overlaps the previous one.
Once you have wound the paper strip around the pencil, carefully remove the pencil from the center of the strip.
To secure the edge of the paper strip, use glue or tape to hold it in place.
With the prepared paper tubes, you can now start weaving various crafts. You can find patterns and designs for these crafts on the Internet or in books on applied arts.
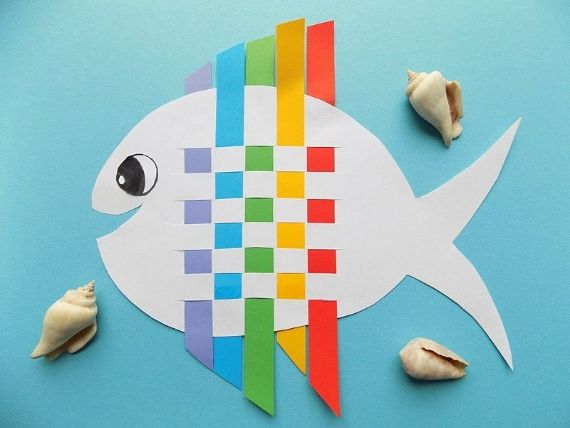
Rainbow paper fish
Here’s a step-by-step guide on how to create rainbow paper fish through the art of paper weaving:
Materials needed:
Colored construction paper or cardstock in rainbow colors (red, orange, yellow, green, blue, indigo, violet)
Scissors
Pencil
Glue or tape
Googly eyes (optional)
Instructions:
Cut the colored construction paper into strips. Make each strip approximately 1 inch wide and 8 inches long. You’ll need two strips of each color for weaving.
Take two strips of paper in different colors, such as red and orange. Overlap them at one end to form an “L” shape. Secure the overlapping ends together using glue or tape.
Start weaving by taking the top strip (red) and weaving it over and under the bottom strip (orange). Repeat this weaving pattern until you reach the end of the strips.
Once you reach the end, glue or tape the loose ends of the strips together to secure the woven portion.
Repeat steps 2-4 for the remaining colors of the rainbow, alternating the colors as you go. Make sure each woven strip is connected to the previous one.
After weaving all the rainbow colors, you’ll have a long rainbow strip. Bend it into a semi-circle shape to form the body of the fish.
To create the tail, take two shorter strips of paper in a matching color, such as violet, and glue or tape them together at one end. Weave them together using the same over-and-under pattern as before. Trim any excess length if needed, and secure the loose ends of the tail using glue or tape.
Attach the tail to the back of the rainbow strip by gluing or taping it in place.
Cut a small triangle shape from a contrasting color of paper, such as yellow, to make the fish’s mouth. Glue or tape it to the front end of the rainbow strip.
If desired, attach googly eyes above the mouth using glue.
Your rainbow paper fish is now complete! You can display it by hanging it up or attaching a string to create a mobile.
Feel free to get creative and experiment with different paper sizes, colors, and embellishments to make your paper fish unique and personalized. Enjoy the process of creating your colorful fish! Bottom of Form
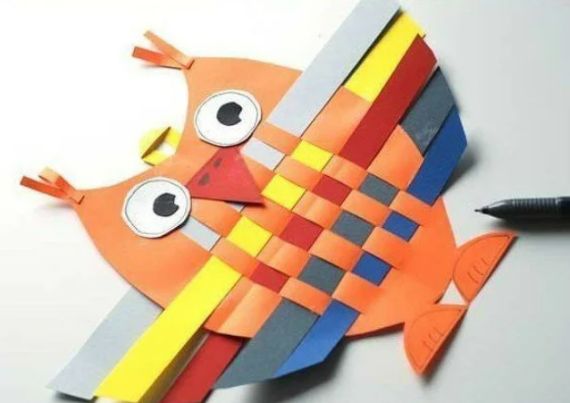
Paper Weaving: Colored Owl Stripe Crafts
Paper weaving is a creative and versatile craft technique that involves interlacing strips of colored paper to create beautiful patterns. If you’d like to make a colored owl stripe craft using paper weaving, here’s a step-by-step guide to help you:
Materials you’ll need:
Colored paper strips in various shades, preferably in colors inspired by owls such as browns, grays, and whites.
Cardstock or heavy paper to use as a base.
Scissors.
Glue or adhesive.
Instructions:
Begin by cutting your colored paper into strips of equal width. The length of the strips will depend on the size of your desired owl stripe craft.
Take the cardstock or heavy paper and cut it into the shape you want for your owl. You can choose to create an owl silhouette or a rectangular shape for a striped background.
Arrange the owl-shaped or rectangular base on your work surface.
Select the first colored strip for your weaving pattern. Fold one end of the strip diagonally to form a small triangle. Apply a small amount of glue to the folded end and secure it to the base.
Weave the folded end of the strip under and over the base, alternating the pattern to create a woven effect. Ensure that the tension is tight to achieve a neater appearance.
Once you reach the end of the strip, fold the remaining portion diagonally to form another triangle. Apply glue to secure the end to the base.
Choose the next colored strip and repeat the weaving process, starting from where the previous strip ended. You can alternate colors or create a specific pattern to resemble owl stripes.
Keep weaving strips of different colors until you cover the entire owl silhouette or rectangular base, ensuring there are no gaps between the strips. Trim any excess length of the strips if needed.
After finishing the weaving, gently press down on the strips to ensure they are firmly secured to the base.
Allow the glue to dry completely before handling the finished craft.
Additional Tips:
Feel free to experiment with different color combinations to create unique owl stripe crafts.
Enhance the owl’s features by adding additional embellishments such as paper feathers, googly eyes, or a beak cut from colored paper.
If you want to make the owl stripe craft more durable, you can laminate the finished piece or adhere it to a thicker backing material.
Remember, paper weaving is a versatile craft, so don’t hesitate to explore various shapes, designs, and color schemes to make your owl stripe craft truly one-of-a-kind and personalized.
WEAVING PAPER PAINTINGS
Paper painting weaving is an innovative and distinctive artistic technique that blends the qualities of painting and weaving. This captivating art form entails the skillful interlacing of painted paper strips to form elaborate patterns and designs.
Here’s a revised version of the step-by-step guide on weaving paper paintings:
Materials:
Colored paper or cardstock
Scissors
Acrylic or watercolor paints
Paintbrushes
Glue or adhesive
Step 1: Prepare your paper
Cut the colored paper into long, thin strips. The width of the strips will determine the thickness of your weaving lines.
You can experiment with different colors and shades to create a varied and interesting composition.
Step 2: Paint the paper
Use acrylic or watercolor paints to add colors, patterns, and textures to the paper strips.
You can paint each strip individually or paint a larger piece of paper and then cut it into strips.
Step 3: Create a base
Take a sheet of heavy paper or cardboard as your base. This will provide stability and support for your weaving.
Glue the ends of a few strips horizontally across the base, evenly spaced apart. These strips will serve as the foundation for your weaving.
Step 4: Weave the paper strips
Take another paper strip and weave it over and under the foundation strips.
Continue weaving additional strips, alternating the over-under pattern to create a woven effect.
Press the strips tightly together as you go to ensure a neat and compact weaving.
Step 5: Experiment with colors and patterns
Try different color combinations and patterns as you weave the paper strips.
You can create stripes, gradients, or even incorporate geometric shapes and designs into your weaving.
Step 6: Secure the ends
Once you have completed your weaving, trim any excess paper from the ends of the strips.
Glue or tape the ends to the back of the base to secure them in place.
Step 7: Finishing touches
You can further enhance your paper weaving by adding additional painted details, such as highlights, shadows, or texture.
Consider framing your woven paper painting to display it as a finished artwork.
Remember, weaving paper paintings is a highly customizable and open-ended art form, so feel free to experiment with different techniques, materials, and designs to create your own unique pieces. Enjoy the process and let your creativity shine!
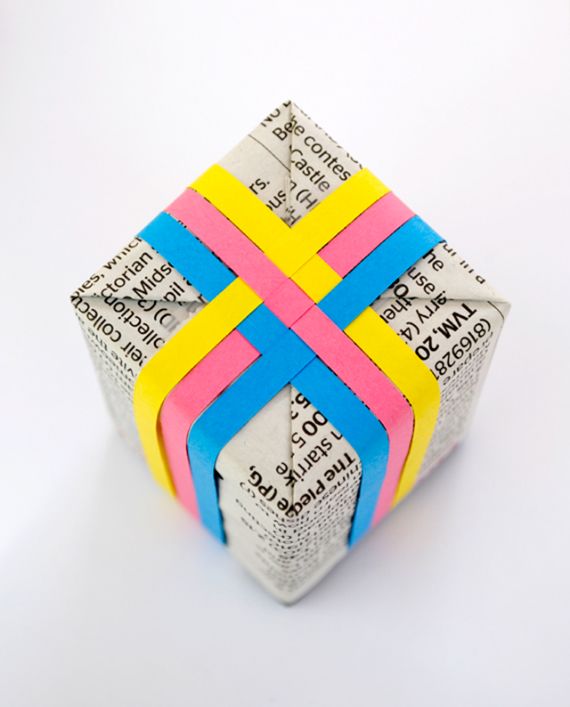
WOVEN PAPER GIFT TOPPER
A woven paper gift topper is a delightful ornament crafted by interlacing strips of paper, resulting in a distinctive design. It serves as a decorative embellishment for gift boxes, bags, and greeting cards, infusing them with a personalized charm. With its versatility, the woven paper technique can be tailored to suit various occasions or themes, making your gift presentation truly special.
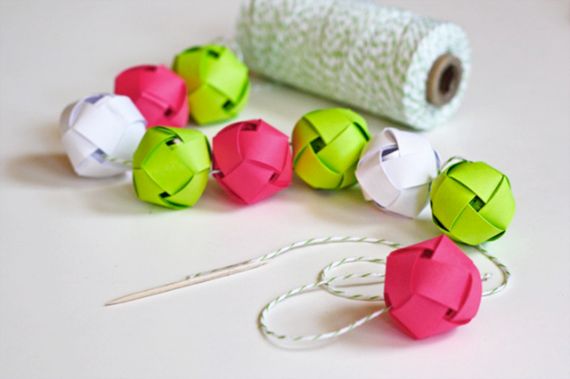
Woven balls garland
A woven paper ball garland is a charming decorative piece formed by connecting numerous woven paper balls. It serves as a delightful ornament suitable for diverse festivities, including birthdays, weddings, and holiday celebrations. Crafting a woven paper ball garland at home presents an enjoyable and imaginative DIY activity.


